Spring MVC的介绍及使用

Spring MVC介绍及使用

1、什么是MVC?

​ MVC是模型(Model)、视图(View)、控制器(Controller)的简写,是一种软件设计规范。就是将业务逻辑、数据、显示分离的方法来组织代码。MVC主要作用是降低了视图与业务逻辑间的双向偶合。MVC不是一种设计模式,MVC是一种架构模式。当然不同的MVC存在差异。

Model(模型):数据模型,提供要展示的数据,因此包含数据和行为,可以认为是领域模型或JavaBean组件(包含数据和行为),不过现在一般都分离开来:Value Object(数据Dao) 和 服务层(行为Service)。也就是模型提供了模型数据查询和模型数据的状态更新等功能,包括数据和业务。

View(视图):负责进行模型的展示,一般就是我们见到的用户界面,客户想看到的东西。

Controller(控制器):接收用户请求,委托给模型进行处理(状态改变),处理完毕后把返回的模型数据返回给视图,由视图负责展示。 也就是说控制器做了个调度员的工作。

​ 其实在最早期的时候还有model1和model2的设计模型

最典型的MVC就是JSP + servlet + javabean的模式。

![mvc](Spring MVC的介绍及使用/mvc.png)

代码展示:

HelloServlet.java

1
2
3
4
5
6
7
8
9
10
11
12
13
14
15
16
17
18
19
20
21
22
23
package com.oi.controller;

import javax.servlet.ServletException;
import javax.servlet.http.HttpServlet;
import javax.servlet.http.HttpServletRequest;
import javax.servlet.http.HttpServletResponse;
import java.io.IOException;

public class HelloServlet extends HttpServlet {
protected void doPost(HttpServletRequest request, HttpServletResponse response) throws ServletException, IOException {
String method = request.getParameter("method");
if (method.equals("add")){
request.getSession().setAttribute("msg","add");
}else if(method.equals("sub")){
request.getSession().setAttribute("msg","sub");
}
request.getRequestDispatcher("index.jsp").forward(request,response);
}

protected void doGet(HttpServletRequest request, HttpServletResponse response) throws ServletException, IOException {
this.doPost(request, response);
}
}

web.xml

1
2
3
4
5
6
7
8
9
10
11
12
13
14
15
<?xml version="1.0" encoding="UTF-8"?>
<web-app xmlns="http://xmlns.jcp.org/xml/ns/javaee"
xmlns:xsi="http://www.w3.org/2001/XMLSchema-instance"
xsi:schemaLocation="http://xmlns.jcp.org/xml/ns/javaee http://xmlns.jcp.org/xml/ns/javaee/web-app_4_0.xsd"
version="4.0">

<servlet>
<servlet-name>HelloServlet</servlet-name>
<servlet-class>com.oi.controller.HelloServlet</servlet-class>
</servlet>
<servlet-mapping>
<servlet-name>HelloServlet</servlet-name>
<url-pattern>/user</url-pattern>
</servlet-mapping>
</web-app>

index.jsp

1
2
3
4
5
6
7
8
9
<%@ page contentType="text/html;charset=UTF-8" language="java" %>
<html>
<head>
<title>$Title$</title>
</head>
<body>
${msg}
</body>
</html>

输入网址:http://localhost:8080/servlet_demo_war_exploded/user?method=add

2、SpringMVC

1、SpringMVC的介绍
1
2
Spring Web MVC is the original web framework built on the Servlet API and has been included in the Spring Framework from the very beginning. The formal name, “Spring Web MVC,” comes from the name of its source module (spring-webmvc), but it is more commonly known as “Spring MVC”.
Spring Web MVC是构建在Servlet API上的原始Web框架,从一开始就包含在Spring Framework中。 正式名称 “Spring Web MVC,” 来自其源模块(spring-webmvc)的名称,但它通常被称为“Spring MVC”。

​ 简而言之,springMVC是Spring框架的一部分,是基于java实现的一个轻量级web框架。

​ 学习SpringMVC框架最核心的就是DispatcherServlet的设计,掌握好DispatcherServlet是掌握SpringMVC的核心关键。

2、SpringMVC的优点

​ 1.清晰的角色划分:控制器(controller)、验证器(validator)、命令对象(command obect)、表单对象(form object)、模型对象(model object)、Servlet分发器(DispatcherServlet)、处理器映射(handler mapping)、试图解析器(view resoler)等等。每一个角色都可以由一个专门的对象来实现。

​ 2.强大而直接的配置方式:将框架类和应用程序类都能作为JavaBean配置,支持跨多个context的引用,例如,在web控制器中对业务对象和验证器validator)的引用。
​ 3.可适配、非侵入:可以根据不同的应用场景,选择何事的控制器子类(simple型、command型、from型、wizard型、multi-action型或者自定义),而不是一个单一控制器(比如Action/ActionForm)继承。
​ 4.可重用的业务代码:可以使用现有的业务对象作为命令或表单对象,而不需要去扩展某个特定框架的基类。
​ 5.可定制的绑定(binding)和验证(validation):比如将类型不匹配作为应用级的验证错误,这可以保证错误的值。再比如本地化的日期和数字绑定等等。在其他某些框架中,你只能使用字符串表单对象,需要手动解析它并转换到业务对象。
​ 6.可定制的handler mapping和view resolution:Spring提供从最简单的URL映射,到复杂的、专用的定制策略。与某些web MVC框架强制开发人员使用单一特定技术相比,Spring显得更加灵活。
​ 7.灵活的model转换:在Springweb框架中,使用基于Map的键/值对来达到轻易的与各种视图技术集成。
​ 8.可定制的本地化和主题(theme)解析:支持在JSP中可选择地使用Spring标签库、支持JSTL、支持Velocity(不需要额外的中间层)等等。
​ 9.简单而强大的JSP标签库(Spring Tag Library):支持包括诸如数据绑定和主题(theme)之类的许多功能。他提供在标记方面的最大灵活性。
​ 10.JSP表单标签库:在Spring2.0中引入的表单标签库,使用在JSP编写表单更加容易。
​ 11.Spring Bean的生命周期:可以被限制在当前的HTTp Request或者HTTp Session。准确的说,这并非Spring MVC框架本身特性,而应归属于Spring MVC使用的WebApplicationContext容器。

3、SpringMVC的实现原理

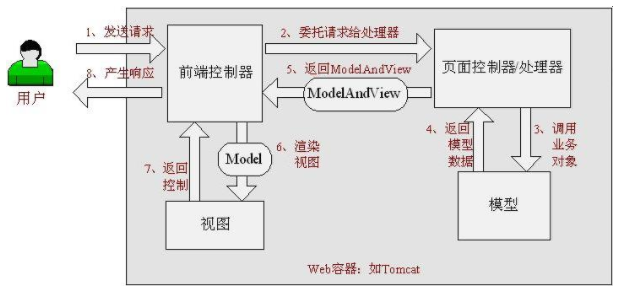
​ springmvc的mvc模式:

![](Spring MVC的介绍及使用/springmvc.png)

SpringMVC的具体执行流程:

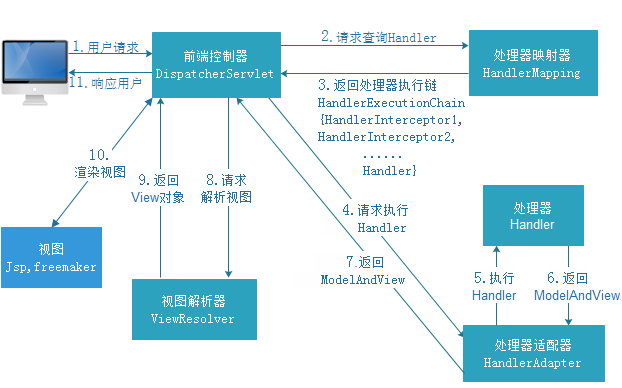
​ 当发起请求时被前置的控制器拦截到请求,根据请求参数生成代理请求,找到请求对应的实际控制器,控制器处理请求,创建数据模型,访问数据库,将模型响应给中心控制器,控制器使用模型与视图渲染视图结果,将结果返回给中心控制器,再将结果返回给请求者。
![](Spring MVC的介绍及使用/springmvc运行流程.jpg)

1
2
3
4
5
6
7
8
9
10
11
1、DispatcherServlet表示前置控制器,是整个SpringMVC的控制中心。用户发出请求,DispatcherServlet接收请求并拦截请求。
2、HandlerMapping为处理器映射。DispatcherServlet调用HandlerMapping,HandlerMapping根据请求url查找Handler。
3、返回处理器执行链,根据url查找控制器,并且将解析后的信息传递给DispatcherServlet
4、HandlerAdapter表示处理器适配器,其按照特定的规则去执行Handler。
5、执行handler找到具体的处理器
6、Controller将具体的执行信息返回给HandlerAdapter,如ModelAndView。
7、HandlerAdapter将视图逻辑名或模型传递给DispatcherServlet。
8、DispatcherServlet调用视图解析器(ViewResolver)来解析HandlerAdapter传递的逻辑视图名。
9、视图解析器将解析的逻辑视图名传给DispatcherServlet。
10、DispatcherServlet根据视图解析器解析的视图结果,调用具体的视图,进行试图渲染
11、将响应数据返回给客户端

3、基于XML的Hello_SpringMVC

1、添加pom依赖

1
2
3
4
5
6
7
8
9
10
11
12
13
14
15
16
17
18
19
20
<dependencies>
<!-- https://mvnrepository.com/artifact/org.springframework/spring-context -->
<dependency>
<groupId>org.springframework</groupId>
<artifactId>spring-context</artifactId>
<version>5.2.3.RELEASE</version>
</dependency>
<!-- https://mvnrepository.com/artifact/org.springframework/spring-web -->
<dependency>
<groupId>org.springframework</groupId>
<artifactId>spring-web</artifactId>
<version>5.2.3.RELEASE</version>
</dependency>
<!-- https://mvnrepository.com/artifact/org.springframework/spring-webmvc -->
<dependency>
<groupId>org.springframework</groupId>
<artifactId>spring-webmvc</artifactId>
<version>5.2.3.RELEASE</version>
</dependency>
</dependencies>

2、编写web.xml文件

1
2
3
4
5
6
7
8
9
10
11
12
13
14
15
16
17
18
19
20
21
22
<?xml version="1.0" encoding="UTF-8"?>
<web-app xmlns="http://xmlns.jcp.org/xml/ns/javaee"
xmlns:xsi="http://www.w3.org/2001/XMLSchema-instance"
xsi:schemaLocation="http://xmlns.jcp.org/xml/ns/javaee http://xmlns.jcp.org/xml/ns/javaee/web-app_4_0.xsd"
version="4.0">
<!--配置DispatcherServlet-->
<servlet>
<servlet-name>springmvc</servlet-name>
<servlet-class>org.springframework.web.servlet.DispatcherServlet</servlet-class>
<!--关联springmvc的配置文件-->
<init-param>
<param-name>contextConfigLocation</param-name>
<param-value>classpath:applicationContext.xml</param-value>
</init-param>
</servlet>
<!--匹配servlet的请求,/标识匹配所有请求-->
<servlet-mapping>
<servlet-name>springmvc</servlet-name>
<!--/*和/都是拦截所有请求,/会拦截的请求不包含*.jsp,而/*的范围更大,还会拦截*.jsp这些请求-->
<url-pattern>/</url-pattern>
</servlet-mapping>
</web-app>

3、编写springmvc需要的spring配置文件,applicationContext.xml

1
2
3
4
5
6
7
8
9
10
11
12
13
14
15
16
17
18
19
20
<?xml version="1.0" encoding="UTF-8"?>
<beans xmlns="http://www.springframework.org/schema/beans"
xmlns:xsi="http://www.w3.org/2001/XMLSchema-instance"
xsi:schemaLocation="http://www.springframework.org/schema/beans http://www.springframework.org/schema/beans/spring-beans.xsd">

<!--处理映射器-->
<bean class="org.springframework.web.servlet.handler.BeanNameUrlHandlerMapping"></bean>
<!--处理器适配器-->
<bean class="org.springframework.web.servlet.mvc.SimpleControllerHandlerAdapter"></bean>

<!--视图解析器-->
<bean id="internalResourceViewResolver" class="org.springframework.web.servlet.view.InternalResourceViewResolver">
<!--配置前缀-->
<property name="prefix" value="/WEB-INF/jsp/"></property>
<!--配置后缀-->
<property name="suffix" value=".jsp"></property>
</bean>

<bean id="/hello" class="com.oi.controller.HelloController"></bean>
</beans>

4、HelloController.java

1
2
3
4
5
6
7
8
9
10
11
12
13
14
15
16
17
18
19
20
package com.oi.controller;


import org.springframework.web.servlet.ModelAndView;
import org.springframework.web.servlet.mvc.Controller;

import javax.servlet.http.HttpServletRequest;
import javax.servlet.http.HttpServletResponse;

public class HelloController implements Controller {
public ModelAndView handleRequest(HttpServletRequest httpServletRequest, HttpServletResponse httpServletResponse) throws Exception {
//创建模型和视图对象
ModelAndView mv = new ModelAndView();
//将需要的值传递到model中
mv.addObject("msg","helloSpringMVC");
//设置要跳转的视图,
mv.setViewName("hello");
return mv;
}
}

5、创建hello.jsp页面

1
2
3
4
5
6
7
8
9
10
11
12
13
14
15
16
<%--
Created by IntelliJ IDEA.
User: root
Date: 2020/3/5
Time: 20:25
To change this template use File | Settings | File Templates.
--%>
<%@ page contentType="text/html;charset=UTF-8" language="java" %>
<html>
<head>
<title>Title</title>
</head>
<body>
${msg}
</body>
</html>

6、配置tomcat,发送请求

http://localhost:8080/hello

4、基于注解的Hello_SpringMVC

1、添加pom依赖

1
2
3
4
5
6
7
8
9
10
11
12
13
14
15
16
17
18
19
20
<dependencies>
<!-- https://mvnrepository.com/artifact/org.springframework/spring-context -->
<dependency>
<groupId>org.springframework</groupId>
<artifactId>spring-context</artifactId>
<version>5.2.3.RELEASE</version>
</dependency>
<!-- https://mvnrepository.com/artifact/org.springframework/spring-web -->
<dependency>
<groupId>org.springframework</groupId>
<artifactId>spring-web</artifactId>
<version>5.2.3.RELEASE</version>
</dependency>
<!-- https://mvnrepository.com/artifact/org.springframework/spring-webmvc -->
<dependency>
<groupId>org.springframework</groupId>
<artifactId>spring-webmvc</artifactId>
<version>5.2.3.RELEASE</version>
</dependency>
</dependencies>

2、编写web.xml文件

1
2
3
4
5
6
7
8
9
10
11
12
13
14
15
16
17
18
19
20
21
22
23
24
25
26
<?xml version="1.0" encoding="UTF-8"?>
<web-app xmlns="http://xmlns.jcp.org/xml/ns/javaee"
xmlns:xsi="http://www.w3.org/2001/XMLSchema-instance"
xsi:schemaLocation="http://xmlns.jcp.org/xml/ns/javaee http://xmlns.jcp.org/xml/ns/javaee/web-app_4_0.xsd"
version="4.0">
<!--配置DispatcherServlet-->
<servlet>
<servlet-name>springmvc</servlet-name>
<servlet-class>org.springframework.web.servlet.DispatcherServlet</servlet-class>
<!--
关联springmvc的配置文件
-->
<init-param>
<param-name>contextConfigLocation</param-name>
<param-value>classpath:applicationContext.xml</param-value>
</init-param>
</servlet>
<!--匹配servlet的请求,
/:标识匹配所有请求,但是不会jsp页面
/*:拦截所有请求,拦截jsp页面
-->
<servlet-mapping>
<servlet-name>springmvc</servlet-name>
<url-pattern>/</url-pattern>
</servlet-mapping>
</web-app>

3、编写applicationContext.xml文件

1
2
3
4
5
6
7
8
9
10
11
12
13
14
15
16
17
18
<?xml version="1.0" encoding="UTF-8"?>
<beans xmlns="http://www.springframework.org/schema/beans"
xmlns:xsi="http://www.w3.org/2001/XMLSchema-instance"
xmlns:context="http://www.springframework.org/schema/context"
xmlns:mvc="http://www.springframework.org/schema/mvc"
xsi:schemaLocation="http://www.springframework.org/schema/beans http://www.springframework.org/schema/beans/spring-beans.xsd http://www.springframework.org/schema/context https://www.springframework.org/schema/context/spring-context.xsd http://www.springframework.org/schema/mvc https://www.springframework.org/schema/mvc/spring-mvc.xsd">

<!--自动扫描包,由IOC容器进行控制管理-->
<context:component-scan base-package="com.oi"></context:component-scan>
<!-- 视图解析器 -->
<bean class="org.springframework.web.servlet.view.InternalResourceViewResolver"
id="internalResourceViewResolver">
<!-- 前缀 -->
<property name="prefix" value="/WEB-INF/jsp/" />
<!-- 后缀 -->
<property name="suffix" value=".jsp" />
</bean>
</beans>

4、编写HelloController.java

1
2
3
4
5
6
7
8
9
10
11
12
13
14
15
16
17
18
19
package com.oi.controller;

import org.springframework.stereotype.Controller;
import org.springframework.ui.Model;
import org.springframework.web.bind.annotation.RequestMapping;

@Controller
public class HelloController{
/*
* @RequestMapping就是用来标识此方法用来处理什么请求,其中的/可以取消
* 取消后默认也是从当前项目的根目录开始查找,一般在编写的时候看个人习惯
* 同时,@RequestMapping也可以用来加在类上,
* */
@RequestMapping("/hello")
public String hello(Model model){
model.addAttribute("msg","hello,SpringMVC");
return "hello";
}
}

5、编写hello.jsp

1
2
3
4
5
6
7
8
9
<%@ page contentType="text/html;charset=UTF-8" language="java" %>
<html>
<head>
<title>Title</title>
</head>
<body>
${msg}
</body>
</html>

6、输入请求http://localhost:8080/hello

5、注意细节

1、springmvc_helloworld运行流程:

​ 通过上述的代码,我们能够总结出具体的运行流程:

​ 1、客户端发送请求http://localhost:8080/hello

​ 2、由tomcat接受到对应的请求

​ 3、SpringMVC的前端控制器DispatcherServlet接收到所有的请求

​ 4、查看请求地址和@RequestMapping注解的哪个匹配,来找到具体的类的处理方法

​ 5、前端控制器找到目标处理类和方法之后,执行目标方法

​ 6、方法执行完成之后会有一个返回值,SpringMVC会将这个返回值用视图解析器进行解析拼接成完整的页面地址

​ 7、DispatcherServlet拿到页面地址之后,转发到具体的页面

2、springmvc的配置文件

web.xml

1
2
3
4
5
6
7
8
9
10
11
12
13
14
15
16
17
18
19
20
21
22
23
<?xml version="1.0" encoding="UTF-8"?>
<web-app xmlns="http://xmlns.jcp.org/xml/ns/javaee"
xmlns:xsi="http://www.w3.org/2001/XMLSchema-instance"
xsi:schemaLocation="http://xmlns.jcp.org/xml/ns/javaee http://xmlns.jcp.org/xml/ns/javaee/web-app_4_0.xsd"
version="4.0">
<!--配置DispatcherServlet-->
<servlet>
<servlet-name>springmvc</servlet-name>
<servlet-class>org.springframework.web.servlet.DispatcherServlet</servlet-class>
<!--
关联springmvc的配置文件
此配置文件的属性可以不添加,但是需要在WEB-INF的目录下创建 前端控制器名称-servlet.xml文件
-->
<init-param>
<param-name>contextConfigLocation</param-name>
<param-value>classpath:applicationContext.xml</param-value>
</init-param>
</servlet>
<servlet-mapping>
<servlet-name>springmvc</servlet-name>
<url-pattern>/</url-pattern>
</servlet-mapping>
</web-app>
3、DispatcherServlet的url-pattern

web.xml

1
2
3
4
5
6
7
8
9
10
11
12
13
14
15
16
17
18
19
20
21
22
23
24
25
26
27
28
29
30
31
32
33
34
<?xml version="1.0" encoding="UTF-8"?>
<web-app xmlns="http://xmlns.jcp.org/xml/ns/javaee"
xmlns:xsi="http://www.w3.org/2001/XMLSchema-instance"
xsi:schemaLocation="http://xmlns.jcp.org/xml/ns/javaee http://xmlns.jcp.org/xml/ns/javaee/web-app_4_0.xsd"
version="4.0">
<!--配置DispatcherServlet-->
<servlet>
<servlet-name>springmvc</servlet-name>
<servlet-class>org.springframework.web.servlet.DispatcherServlet</servlet-class>
<!--
关联springmvc的配置文件
此配置文件的属性可以不添加,但是需要在WEB-INF的目录下创建 前端控制器名称-servlet.xml文件
-->
<init-param>
<param-name>contextConfigLocation</param-name>
<param-value>classpath:applicationContext.xml</param-value>
</init-param>
</servlet>
<!--匹配servlet的请求,
/:标识匹配所有请求,但是不会jsp页面
/*:拦截所有请求,拦截jsp页面

但是需要注意的是,当配置成index.html的时候,会发现请求不到
原因在于,tomcat下也有一个web.xml文件,所有的项目下web.xml文件都需要继承此web.xml
在服务器的web.xml文件中有一个DefaultServlet用来处理静态资源,但是url-pattern是/
而我们在自己的配置文件中如果添加了url-pattern=/会覆盖父类中的url-pattern,此时在请求的时候
DispatcherServlet会去controller中做匹配,找不到则直接报404
而在服务器的web.xml文件中包含了一个JspServlet的处理,所以不过拦截jsp请求
-->
<servlet-mapping>
<servlet-name>springmvc</servlet-name>
<url-pattern>/</url-pattern>
</servlet-mapping>
</web-app>
4、@RequestMapping

​ @RequestMapping用来匹配客户端发送的请求,可以在方法上使用,也可以在类上使用。

​ 方法:表示用来匹配要处理的请求

​ 类上:表示为当前类的所有方法的请求地址添加一个前置路径,访问的时候必须要添加此路径

1
2
3
4
5
6
7
8
9
10
11
12
13
14
15
16
17
18
19
20
21
package com.oi.controller;

import org.springframework.stereotype.Controller;
import org.springframework.ui.Model;
import org.springframework.web.bind.annotation.RequestMapping;

@Controller
@RequestMapping("/oi")
public class HelloController{

/*
* @RequestMapping就是用来标识此方法用来处理什么请求,其中的/可以取消
* 取消后默认也是从当前项目的根目录开始查找,一般在编写的时候看个人习惯
* 同时,@RequestMapping也可以用来加在类上,
* */
@RequestMapping("/hello")
public String hello(Model model){
model.addAttribute("msg","hello,SpringMVC");
return "hello";
}
}

注意:在整个项目的不同方法上不能包含相同的@RequestMapping值

​ 除此以外,@RequestMapping注解还可以添加很多额外的属性值,用来精确匹配请求

1
2
3
4
5
6
7
8
9
10
11
12
13
14
15
16
17
18
19
20
21
22
23
24
25
26
27
28
29
30
31
32
33
34
35
36
37
38
39
40
41
42
43
44
45
46
47
48
49
50
51
52
53
54
55
56
57
58
59
60
package com.oi.controller;

import org.springframework.stereotype.Controller;
import org.springframework.ui.Model;
import org.springframework.web.bind.annotation.RequestMapping;
import org.springframework.web.bind.annotation.RequestMethod;

@Controller
@RequestMapping("/oi")
public class HelloController{

/*
* @RequestMapping就是用来标识此方法用来处理什么请求,其中的/可以取消
* 取消后默认也是从当前项目的根目录开始查找,一般在编写的时候看个人习惯
* 同时,@RequestMapping也可以用来加在类上,
* */
@RequestMapping("/hello")
public String hello(Model model){
model.addAttribute("msg","hello,SpringMVC");
return "hello";
}

/**
* Request的其他属性值
* value:要匹配的请求
* method:限制发送请求的方式: POST GET
* params:表示请求要接受的参数,如果定义了这个属性,那么发送的时候必须要添加参数
* params有几种匹配规则
* 1、直接写参数的名称,param1,param2
* params = {"username"}
* 2、表示请求不能包含的参数,!param1
* params = {"!username"}
* 3、表示请求中需要要包含的参数但是可以限制值 param1=values param1!=value
* params = {"username=123","age"}
* params = {"username!=123","age"}
* headers:填写请求头信息
* chrome:User-Agent=Mozilla/5.0 (Windows NT 10.0; Win64; x64) AppleWebKit/537.36 (KHTML, like Gecko) Chrome/79.0.3945.79 Safari/537.36
* firefox:User-Agent=Mozilla/5.0 (Windows NT 10.0; Win64; x64; rv:73.0) Gecko/20100101 Firefox/73.0
*
* consumers:只接受内容类型是哪种的请求,相当于指定Content-Type
* produces:返回的内容类型 Content-Type:text/html;charset=utf-8
*
* @return
*/
@RequestMapping(value = "/hello2",method = RequestMethod.POST)
public String hello2(){
return "hello";
}

@RequestMapping(value = "/hello3",params = {"username!=123","age"})
public String hello3(String username){
System.out.println(username);
return "hello";
}

@RequestMapping(value = "/hello4",headers = {"User-Agent=Mozilla/5.0 (Windows NT 10.0; Win64; x64; rv:73.0) Gecko/20100101 Firefox/73.0"})
public String hello4(){
return "hello";
}
}

​ @RequestMapping还包含了很多复杂的匹配功能,提供了通配符的支持:

1
2
3
4
5
6
7
8
9
10
11
12
13
14
15
16
17
18
19
20
21
22
23
24
25
26
27
28
29
30
31
32
33
34
35
36
37
38
39
40
41
42
43
44
45
46
47
48
49
50
51
52
53
54
55
56
57
58
59
60
61
62
63
64
65
66
67
68
69
70
71
72
73
package com.oi.controller;

import org.springframework.stereotype.Controller;
import org.springframework.ui.Model;
import org.springframework.web.bind.annotation.RequestMapping;
import org.springframework.web.bind.annotation.RequestMethod;

@Controller
@RequestMapping("/oi")
public class HelloController{

/*
* @RequestMapping就是用来标识此方法用来处理什么请求,其中的/可以取消
* 取消后默认也是从当前项目的根目录开始查找,一般在编写的时候看个人习惯
* 同时,@RequestMapping也可以用来加在类上,
* */
@RequestMapping("/hello")
public String hello(Model model){
model.addAttribute("msg","hello,SpringMVC");
return "hello";
}

/**
* Request的其他属性值
* value:要匹配的请求
* method:限制发送请求的方式: POST GET
* params:表示请求要接受的参数,如果定义了这个属性,那么发送的时候必须要添加参数
* params有几种匹配规则
* 1、直接写参数的名称,param1,param2
* params = {"username"}
* 2、表示请求不能包含的参数,!param1
* params = {"!username"}
* 3、表示请求中需要要包含的参数但是可以限制值 param1=values param1!=value
* params = {"username=123","age"}
* params = {"username!=123","age"}
* headers:填写请求头信息
* chrome:User-Agent=Mozilla/5.0 (Windows NT 10.0; Win64; x64) AppleWebKit/537.36 (KHTML, like Gecko) Chrome/79.0.3945.79 Safari/537.36
* firefox:User-Agent=Mozilla/5.0 (Windows NT 10.0; Win64; x64; rv:73.0) Gecko/20100101 Firefox/73.0
*
* consumers:只接受内容类型是哪种的请求,相当于指定Content-Type
* produces:返回的内容类型 Content-Type:text/html;charset=utf-8
*
* @return
*/
@RequestMapping(value = "/hello2",method = RequestMethod.POST)
public String hello2(){
return "hello";
}

@RequestMapping(value = "/hello3",params = {"username!=123","age"})
public String hello3(String username){
System.out.println(username);
return "hello";
}

@RequestMapping(value = "/hello4",headers = {"User-Agent=Mozilla/5.0 (Windows NT 10.0; Win64; x64; rv:73.0) Gecko/20100101 Firefox/73.0"})
public String hello4(){
return "hello";
}

/**
* @Request包含三种模糊匹配的方式,分别是:
* ?:能替代任意一个字符
* *: 能替代任意多个字符和一层路径
* **:能代替多层路径
* @return
*/
@RequestMapping(value = "/**/h*llo?")
public String hello5(){
System.out.println("hello5");
return "hello";
}
}

6、@PathVariable

​ 如果需要在请求路径中的参数像作为参数应该怎么使用呢?可以使用@PathVariable注解,此注解就是提供了对占位符URL的支持,就是将URL中占位符参数绑定到控制器处理方法的参数中。

1
2
3
4
5
6
7
8
9
10
11
12
13
14
15
16
17
18
package com.oi.controller;

import org.springframework.stereotype.Controller;
import org.springframework.ui.Model;
import org.springframework.web.bind.annotation.PathVariable;
import org.springframework.web.bind.annotation.RequestMapping;
import org.springframework.web.bind.annotation.RequestMethod;

@Controller
@RequestMapping("/oi")
public class HelloController{

@RequestMapping(value = "/pathVariable/{name}")
public String pathVariable(@PathVariable("name") String name){
System.out.println(name);
return "hello";
}
}

7、REST

​ REST即表述性状态传递(英文:Representational State Transfer,简称REST)是Roy Fielding博士在2000年他的博士论文中提出来的一种软件架构风格。它是一种针对网络应用的设计和开发方式,可以降低开发的复杂性,提高系统的可伸缩性。

​ 在三种主流的Web服务实现方案中,因为REST模式的Web服务与复杂的SOAPXML-RPC对比来讲明显的更加简洁,越来越多的web服务开始采用REST风格设计和实现。例如,Amazon.com提供接近REST风格的Web服务进行图书查找;雅虎提供的Web服务也是REST风格的。

​ REST,翻译过来叫做表现层状态转化,是目前最流行的一个互联网软件架构,它架构清晰,符合标准,易于理解,扩展方便。

表现层(Representation):把资源具体呈现出来的形式,因此叫做表现层。

资源(Resource):网络上的一个具体信息,文本,图片,音频,视频都可以称之为资源,如果想要访问到互联网上的某一个资源,那么就必须要使用一个URL来唯一性的获取改资源,也可以这么说,URL是每一个资源的唯一标识符。

状态转化(State Transfer):当客户端发出一个请求的时候,就代表客户端跟服务端的一次交互过程,HTTP是一种无状态协议,即所有的状态都保存在服务器端,因此,客户端如果想要操作服务器,必须通过某些手段,让服务器的状态发生转化,而这种转化是建立在表现层的,这就是名字的由来(非人话)

​ 人话:我们在获取资源的时候就是进行增删改查的操作,如果是原来的架构风格,需要发送四个请求,分别是:

​ 查询:localhost:8080/query?id=1

​ 增加:localhost:8080/insert

​ 删除:localhost:8080/delete?id=1

​ 更新:localhost:8080/update?id=1

​ 按照此方式发送请求的时候比较麻烦,需要定义多种请求,而在HTTP协议中,有不同的发送请求的方式,分别是GET、POST、PUT、DELETE等,我们如果能让不同的请求方式表示不同的请求类型就可以简化我们的查询

​ GET:获取资源 /book/1

​ POST:新建资源 /book

​ PUT:更新资源 /book/1

​ DELETE:删除资源 /book/1

​ 一切看起来都非常美好,但是大家需要注意了,我们在发送请求的时候只能发送post或者get,没有办法发送put和delete请求,那么应该如何处理呢?下面开始进入代码环节:

RestController.java

1
2
3
4
5
6
7
8
9
10
11
12
13
14
15
16
17
18
19
20
21
22
23
24
25
26
27
28
29
30
31
32
33
34
35
package com.oi.controller;

import org.springframework.stereotype.Controller;
import org.springframework.web.bind.annotation.PathVariable;
import org.springframework.web.bind.annotation.RequestMapping;
import org.springframework.web.bind.annotation.RequestMethod;
import org.springframework.web.servlet.view.InternalResourceViewResolver;

@Controller
public class RestController {

@RequestMapping(value = "/user",method = RequestMethod.POST)
public String add(){
System.out.println("添加");
return "success";
}

@RequestMapping(value = "/user/{id}",method = RequestMethod.DELETE)
public String delete(@PathVariable("id") Integer id){
System.out.println("删除:"+id);
return "success";
}

@RequestMapping(value = "/user/{id}",method = RequestMethod.PUT)
public String update(@PathVariable("id") Integer id){
System.out.println("更新:"+id);
return "success";
}

@RequestMapping(value = "/user/{id}",method = RequestMethod.GET)
public String query(@PathVariable("id") Integer id){
System.out.println("查询:"+id);
return "success";
}
}

web.xml

1
2
3
4
5
6
7
8
9
10
11
12
13
14
15
16
17
18
19
20
21
22
23
24
25
26
27
28
29
30
31
32
33
34
35
36
37
38
39
40
41
42
43
<?xml version="1.0" encoding="UTF-8"?>
<web-app xmlns="http://xmlns.jcp.org/xml/ns/javaee"
xmlns:xsi="http://www.w3.org/2001/XMLSchema-instance"
xsi:schemaLocation="http://xmlns.jcp.org/xml/ns/javaee http://xmlns.jcp.org/xml/ns/javaee/web-app_4_0.xsd"
version="4.0">
<!--配置DispatcherServlet-->
<servlet>
<servlet-name>springmvc</servlet-name>
<servlet-class>org.springframework.web.servlet.DispatcherServlet</servlet-class>
<!--
关联springmvc的配置文件:
此配置文件的属性可以不添加,但是需要在WEB-INF的目录下创建 前端控制器名称-servlet.xml文件
-->

<init-param>
<param-name>contextConfigLocation</param-name>
<param-value>classpath:springmvc-servlet.xml</param-value>
</init-param>
</servlet>
<!--匹配servlet的请求,
/:标识匹配所有请求,但是不会jsp页面
/*:拦截所有请求,拦截jsp页面

但是需要注意的是,当配置成index.html的时候,会发现请求不到
原因在于,tomcat下也有一个web.xml文件,所有的项目下web.xml文件都需要继承此web.xml
在服务器的web.xml文件中有一个DefaultServlet用来处理静态资源,但是url-pattern是/
而我们在自己的配置文件中如果添加了url-pattern=/会覆盖父类中的url-pattern,此时在请求的时候
DispatcherServlet会去controller中做匹配,找不到则直接报404
而在服务器的web.xml文件中包含了一个JspServlet的处理,所以不过拦截jsp请求
-->
<servlet-mapping>
<servlet-name>springmvc</servlet-name>
<url-pattern>/</url-pattern>
</servlet-mapping>
<filter>
<filter-name>hiddenFilter</filter-name>
<filter-class>org.springframework.web.filter.HiddenHttpMethodFilter</filter-class>
</filter>
<filter-mapping>
<filter-name>hiddenFilter</filter-name>
<url-pattern>/*</url-pattern>
</filter-mapping>
</web-app>

rest.jsp

1
2
3
4
5
6
7
8
9
10
11
12
13
14
15
16
17
18
19
20
21
22
23
24
25
26
27
<%--
Created by IntelliJ IDEA.
User: root
Date: 2020/3/6
Time: 23:01
To change this template use File | Settings | File Templates.
--%>
<%@ page contentType="text/html;charset=UTF-8" language="java" %>
<html>
<head>
<title>Title</title>
</head>
<body>
<form action="/user" method="post">
<input type="submit" value="增加">
</form>
<form action="/user/1" method="post">
<input name="_method" value="delete" type="hidden">
<input type="submit" value="删除">
</form>
<form action="/user/1" method="post">
<input name="_method" value="put" type="hidden">
<input type="submit" value="修改">
</form>
<a href="/user/1">查询</a><br/>
</body>
</html>

success.jsp

1
2
3
4
5
6
7
8
9
<%@ page contentType="text/html;charset=UTF-8" language="java" isErrorPage="true" %>
<html>
<head>
<title>Title</title>
</head>
<body>
666
</body>
</html>