Spring MVC的进阶使用-2

Spring MVC的使用-2

1、SpringMVC的返回JSON数据

​ 到目前为止我们编写的所有Controller的方法的返回值都是String类型,但是大家应该都知道,我们有时候数据传递特别是在ajax中,我们返回的数据经常需要使用json,那么如何来保证返回的数据的是json格式呢?使用@ResponseBody注解

pom.xml

1
2
3
4
5
6
7
8
9
10
11
12
13
14
15
16
17
18
19
20
21
22
23
24
25
26
27
28
29
30
31
32
33
34
35
36
37
38
39
40
41
42
43
44
45
46
47
48
49
50
51
52
53
54
55
56
57
58
59
60
<?xml version="1.0" encoding="UTF-8"?>
<project xmlns="http://maven.apache.org/POM/4.0.0"
xmlns:xsi="http://www.w3.org/2001/XMLSchema-instance"
xsi:schemaLocation="http://maven.apache.org/POM/4.0.0 http://maven.apache.org/xsd/maven-4.0.0.xsd">
<modelVersion>4.0.0</modelVersion>

<groupId>com.oi</groupId>
<artifactId>springmv_ajax</artifactId>
<version>1.0-SNAPSHOT</version>
<dependencies>
<!-- https://mvnrepository.com/artifact/org.springframework/spring-context -->
<dependency>
<groupId>org.springframework</groupId>
<artifactId>spring-context</artifactId>
<version>5.2.3.RELEASE</version>
</dependency>
<!-- https://mvnrepository.com/artifact/org.springframework/spring-web -->
<dependency>
<groupId>org.springframework</groupId>
<artifactId>spring-web</artifactId>
<version>5.2.3.RELEASE</version>
</dependency>
<!-- https://mvnrepository.com/artifact/org.springframework/spring-webmvc -->
<dependency>
<groupId>org.springframework</groupId>
<artifactId>spring-webmvc</artifactId>
<version>5.2.3.RELEASE</version>
</dependency>
<dependency>
<groupId>javax.servlet</groupId>
<artifactId>servlet-api</artifactId>
<version>2.5</version>
<scope>provided</scope>
</dependency>
<dependency>
<groupId>javax.servlet</groupId>
<artifactId>jsp-api</artifactId>
<version>2.0</version>
<scope>provided</scope>
</dependency>
<!-- https://mvnrepository.com/artifact/com.fasterxml.jackson.core/jackson-core -->
<dependency>
<groupId>com.fasterxml.jackson.core</groupId>
<artifactId>jackson-core</artifactId>
<version>2.10.3</version>
</dependency>
<!-- https://mvnrepository.com/artifact/com.fasterxml.jackson.core/jackson-databind -->
<dependency>
<groupId>com.fasterxml.jackson.core</groupId>
<artifactId>jackson-databind</artifactId>
<version>2.10.3</version>
</dependency>
<!-- https://mvnrepository.com/artifact/com.fasterxml.jackson.core/jackson-annotations -->
<dependency>
<groupId>com.fasterxml.jackson.core</groupId>
<artifactId>jackson-annotations</artifactId>
<version>2.10.3</version>
</dependency>
</dependencies>
</project>

springmvc.xml

1
2
3
4
5
6
7
8
9
10
11
12
13
14
15
16
17
<?xml version="1.0" encoding="UTF-8"?>
<beans xmlns="http://www.springframework.org/schema/beans"
xmlns:xsi="http://www.w3.org/2001/XMLSchema-instance"
xmlns:context="http://www.springframework.org/schema/context"
xmlns:mvc="http://www.springframework.org/schema/mvc"

xsi:schemaLocation="http://www.springframework.org/schema/beans http://www.springframework.org/schema/beans/spring-beans.xsd http://www.springframework.org/schema/context https://www.springframework.org/schema/context/spring-context.xsd http://www.springframework.org/schema/mvc https://www.springframework.org/schema/mvc/spring-mvc.xsd">

<context:component-scan base-package="com.oi"></context:component-scan>

<bean class="org.springframework.web.servlet.view.InternalResourceViewResolver">
<property name="prefix" value="/WEB-INF/page/"></property>
<property name="suffix" value=".jsp"></property>
</bean>
<mvc:default-servlet-handler></mvc:default-servlet-handler>
<mvc:annotation-driven></mvc:annotation-driven>
</beans>

JsonController.java

1
2
3
4
5
6
7
8
9
10
11
12
13
14
15
16
17
18
19
20
21
22
23
24
package com.oi.controller;

import com.oi.bean.User;
import org.springframework.stereotype.Controller;
import org.springframework.web.bind.annotation.RequestMapping;
import org.springframework.web.bind.annotation.ResponseBody;

import java.util.ArrayList;
import java.util.Date;
import java.util.List;

@Controller
public class JsonController {

@ResponseBody
@RequestMapping("/json")
public List<User> json(){
List<User> list = new ArrayList<User>();
list.add(new User(1,"zhangsan",12,"男",new Date(),"1234@qq.com"));
list.add(new User(2,"zhangsan2",12,"男",new Date(),"1234@qq.com"));
list.add(new User(3,"zhangsan3",12,"男",new Date(),"1234@qq.com"));
return list;
}
}

User.java

1
2
3
4
5
6
7
8
9
10
11
12
13
14
15
16
17
18
19
20
21
22
23
24
25
26
27
28
29
30
31
32
33
34
35
36
37
38
39
40
41
42
43
44
45
46
47
48
49
50
51
52
53
54
55
56
57
58
59
60
61
62
63
64
65
66
67
68
69
70
71
72
73
74
75
76
77
78
79
80
81
82
83
84
85
86
87
88
89
90
package com.oi.bean;

import com.fasterxml.jackson.annotation.JsonFormat;
import com.fasterxml.jackson.annotation.JsonIgnore;

import java.util.Date;

public class User {

private Integer id;
private String name;
private Integer age;
private String gender;
@JsonFormat( pattern = "yyyy-MM-dd")
private Date birth;
@JsonIgnore
private String email;

public User() {
}

public User(Integer id, String name, Integer age, String gender, Date birth, String email) {
this.id = id;
this.name = name;
this.age = age;
this.gender = gender;
this.birth = birth;
this.email = email;
}

public Integer getId() {
return id;
}

public void setId(Integer id) {
this.id = id;
}

public String getName() {
return name;
}

public void setName(String name) {
this.name = name;
}

public Integer getAge() {
return age;
}

public void setAge(Integer age) {
this.age = age;
}

public String getGender() {
return gender;
}

public void setGender(String gender) {
this.gender = gender;
}

public Date getBirth() {
return birth;
}

public void setBirth(Date birth) {
this.birth = birth;
}

public String getEmail() {
return email;
}

public void setEmail(String email) {
this.email = email;
}

@Override
public String toString() {
return "User{" +
"id=" + id +
", name='" + name + '\'' +
", age=" + age +
", gender='" + gender + '\'' +
", birth=" + birth +
", email='" + email + '\'' +
'}';
}
}

同时@ResponseBody可以直接将返回的字符串数据作为响应内容

1
2
3
4
5
6
7
8
9
10
11
12
13
14
15
16
17
package com.oi.controller;

import com.oi.bean.User;
import org.springframework.http.HttpEntity;
import org.springframework.stereotype.Controller;
import org.springframework.web.bind.annotation.RequestBody;
import org.springframework.web.bind.annotation.RequestMapping;
import org.springframework.web.bind.annotation.ResponseBody;

@Controller
public class OtherController {
@ResponseBody
@RequestMapping("/testResponseBody")
public String testResponseBody(){
return "<h1>success</h1>";
}
}

2、发送ajax请求获取json数据

ajax.jsp

1
2
3
4
5
6
7
8
9
10
11
12
13
14
15
16
17
18
19
20
21
22
23
24
25
26
27
28
29
30
31
32
33
34
<%@ page import="java.util.Date" %>
<%@ page contentType="text/html;charset=UTF-8" language="java" %>
<html>
<head>
<title>Title</title>
<script type="text/javascript" src="script/jquery-1.9.1.min.js"></script>
</head>
<%
pageContext.setAttribute("ctp",request.getContextPath());
%>
<body>
<%=new Date()%>
<a href="${ctp}/json">获取用户信息</a>
<div>

</div>
<script type="text/javascript">
$("a:first").click(function () {
$.ajax({
url:"${ctp}/json",
type:"GET",
success:function (data) {
console.log(data)
$.each(data,function() {
var user = this.id+"--"+this.name+"--"+this.age+"--"+this.gender+"--"+this.birth+"--"+this.email;
$("div").append(user+'<br/>');
})
}
});
return false;
});
</script>
</body>
</html>

3、使用@RequestBody获取请求体信息

testOther.jsp

1
2
3
4
5
6
7
8
9
10
11
12
13
14
15
16
17
18
19
20
21
22
23
24
<%--
Created by IntelliJ IDEA.
User: root
Date: 2020/3/13
Time: 15:04
To change this template use File | Settings | File Templates.
--%>
<%@ page contentType="text/html;charset=UTF-8" language="java" %>
<html>
<%
pageContext.setAttribute("ctp",request.getContextPath());
%>
<head>
<title>Title</title>
</head>
<body>
<form action="${ctp}/testRequestBody" method="post" enctype="multipart/form-data">
<input name="username" value="zhangsan"><br>
<input name="password" value="123456"><br>
<input type="file" name="file" ><br>
<input type="submit"><br>
</form>
</body>
</html>

OtherController.java

1
2
3
4
5
6
7
8
9
10
11
12
13
14
15
package com.oi.controller;

import org.springframework.stereotype.Controller;
import org.springframework.web.bind.annotation.RequestBody;
import org.springframework.web.bind.annotation.RequestMapping;

@Controller
public class OtherController {

@RequestMapping("/testRequestBody")
public String testRequestBody(@RequestBody String body){
System.out.println("请求体:"+body);
return "success";
}
}

同时@RequestBody能够接受json格式的请求数据:

testOther.jsp

1
2
3
4
5
6
7
8
9
10
11
12
13
14
15
16
17
18
19
20
21
22
23
24
25
26
27
28
29
30
31
32
33
34
35
36
37
38
39
40
41
42
43
<%--
Created by IntelliJ IDEA.
User: root
Date: 2020/3/13
Time: 15:04
To change this template use File | Settings | File Templates.
--%>
<%@ page contentType="text/html;charset=UTF-8" language="java" %>
<script type="text/javascript" src="script/jquery-1.9.1.min.js"></script>
<html>
<%
pageContext.setAttribute("ctp",request.getContextPath());
%>
<head>
<title>Title</title>
</head>
<body>
<form action="${ctp}/testRequestBody" method="post" enctype="multipart/form-data">
<input name="username" value="zhangsan"><br>
<input name="password" value="123456"><br>
<input type="file" name="file" ><br>
<input type="submit"><br>
</form>
<hr/>
<a href="${ctp}/testRequestJson">发送json数据</a>
<script type="text/javascript">
$("a:first").click(function () {
var user = {id:"1",name:"zhangsan",age:"12",gender:"男",birth:"2020-3-13",email:"123@qq.com"};
var userJson = JSON.stringify(user);
$.ajax({
url:"${ctp}/testRequestJson",
type:"POST",
data:userJson,
contentType:"application/json",
success:function (data) {
alert(data);
}
});
return false;
});
</script>
</body>
</html>

OtherController.java

1
2
3
4
5
6
7
8
9
10
11
12
13
14
15
16
17
18
19
20
21
22
package com.oi.controller;

import com.oi.bean.User;
import org.springframework.stereotype.Controller;
import org.springframework.web.bind.annotation.RequestBody;
import org.springframework.web.bind.annotation.RequestMapping;

@Controller
public class OtherController {

@RequestMapping("/testRequestBody")
public String testRequestBody(@RequestBody String body){
System.out.println("请求体:"+body);
return "success";
}

@RequestMapping("/testRequestJson")
public String testRequestBody(@RequestBody User user){
System.out.println("对象:"+user);
return "success";
}
}

在接受请求的时候还可以使用HttpEntity对象,用来接受参数,可以获取请求头信息。

1
2
3
4
5
6
7
8
9
10
11
12
13
14
15
16
17
18
package com.oi.controller;

import com.oi.bean.User;
import org.springframework.http.HttpEntity;
import org.springframework.stereotype.Controller;
import org.springframework.web.bind.annotation.RequestBody;
import org.springframework.web.bind.annotation.RequestMapping;
import org.springframework.web.bind.annotation.ResponseBody;

@Controller
public class OtherController {

@RequestMapping("/testHttpEntity")
public String testRequestBody(HttpEntity<String> httpEntity){
System.out.println(httpEntity);
return "success";
}
}

4、使用RespsonseEntity可以用来定制响应内容

1
2
3
4
5
6
7
8
9
10
11
12
13
14
15
16
17
18
19
20
21
22
23
24
25
package com.oi.controller;

import com.oi.bean.User;
import org.springframework.http.HttpEntity;
import org.springframework.http.HttpHeaders;
import org.springframework.http.HttpStatus;
import org.springframework.http.ResponseEntity;
import org.springframework.stereotype.Controller;
import org.springframework.util.MultiValueMap;
import org.springframework.web.bind.annotation.RequestBody;
import org.springframework.web.bind.annotation.RequestMapping;
import org.springframework.web.bind.annotation.ResponseBody;

@Controller
public class OtherController {

@RequestMapping("/testResponseEntity")
public ResponseEntity<String> testResponseEntity(){

String body = "<h1>hello</h1>";
MultiValueMap<String,String> header = new HttpHeaders();
header.add("Set-Cookie","name=zhangsan");
return new ResponseEntity<String>(body,header, HttpStatus.OK);
}
}

5、文件下载

1
2
3
4
5
6
7
8
9
10
11
12
13
14
15
16
17
18
19
20
21
22
23
24
25
26
27
28
29
30
31
32
33
34
35
36
37
package com.oi.controller;

import com.oi.bean.User;
import org.springframework.http.HttpEntity;
import org.springframework.http.HttpHeaders;
import org.springframework.http.HttpStatus;
import org.springframework.http.ResponseEntity;
import org.springframework.stereotype.Controller;
import org.springframework.util.MultiValueMap;
import org.springframework.web.bind.annotation.RequestBody;
import org.springframework.web.bind.annotation.RequestMapping;
import org.springframework.web.bind.annotation.ResponseBody;

import javax.servlet.ServletContext;
import javax.servlet.http.HttpServletRequest;
import java.io.FileInputStream;
import java.io.FileNotFoundException;

@Controller
public class OtherController {

@RequestMapping("/download")
public ResponseEntity<byte[]> download(HttpServletRequest request) throws Exception {
//获取要下载文件的路径及输入流对象
ServletContext servletContext = request.getServletContext();
String realPath = servletContext.getRealPath("/script/jquery-1.9.1.min.js");
FileInputStream fileInputStream = new FileInputStream(realPath);

byte[] bytes = new byte[fileInputStream.available()];
fileInputStream.read(bytes);
fileInputStream.close();
//将要下载文件内容返回
HttpHeaders httpHeaders = new HttpHeaders();
httpHeaders.set("Content-Disposition","attachment;filename=jquery-1.9.1.min.js");
return new ResponseEntity<byte[]>(bytes,httpHeaders,HttpStatus.OK);
}
}

6、文件上传

​ Spring MVC 为文件上传提供了直接的支持,这种支持是通过即插即用的 MultipartResolver 实现的。Spring 用 Jakarta Commons FileUpload 技术实现了一个 MultipartResolver 实现类:CommonsMultipartResovler

​ Spring MVC 上下文中默认没有装配 MultipartResovler,因此默认情况下不能处理文件的上传工作,如果想使用 Spring 的文件上传功能,需现在上下文中配置 MultipartResolver。

pom.xml

1
2
3
4
5
6
7
8
9
10
11
12
13
14
15
16
17
18
19
20
21
22
23
24
25
26
27
28
29
30
31
32
33
34
35
36
37
38
39
40
41
42
43
44
45
46
47
48
49
50
51
52
53
54
55
56
57
58
59
60
61
62
63
64
65
66
67
68
69
70
71
72
73
74
75
<?xml version="1.0" encoding="UTF-8"?>
<project xmlns="http://maven.apache.org/POM/4.0.0"
xmlns:xsi="http://www.w3.org/2001/XMLSchema-instance"
xsi:schemaLocation="http://maven.apache.org/POM/4.0.0 http://maven.apache.org/xsd/maven-4.0.0.xsd">
<modelVersion>4.0.0</modelVersion>

<groupId>com.oi</groupId>
<artifactId>springmvc_upload</artifactId>
<version>1.0-SNAPSHOT</version>

<dependencies>
<!-- https://mvnrepository.com/artifact/org.springframework/spring-context -->
<dependency>
<groupId>org.springframework</groupId>
<artifactId>spring-context</artifactId>
<version>5.2.3.RELEASE</version>
</dependency>
<!-- https://mvnrepository.com/artifact/org.springframework/spring-web -->
<dependency>
<groupId>org.springframework</groupId>
<artifactId>spring-web</artifactId>
<version>5.2.3.RELEASE</version>
</dependency>
<!-- https://mvnrepository.com/artifact/org.springframework/spring-webmvc -->
<dependency>
<groupId>org.springframework</groupId>
<artifactId>spring-webmvc</artifactId>
<version>5.2.3.RELEASE</version>
</dependency>
<!-- https://mvnrepository.com/artifact/javax.servlet/javax.servlet-api -->
<dependency>
<groupId>javax.servlet</groupId>
<artifactId>javax.servlet-api</artifactId>
<version>4.0.1</version>
<scope>provided</scope>
</dependency>

<dependency>
<groupId>javax.servlet</groupId>
<artifactId>jsp-api</artifactId>
<version>2.0</version>
<scope>provided</scope>
</dependency>
<!-- https://mvnrepository.com/artifact/com.fasterxml.jackson.core/jackson-core -->
<dependency>
<groupId>com.fasterxml.jackson.core</groupId>
<artifactId>jackson-core</artifactId>
<version>2.10.3</version>
</dependency>
<!-- https://mvnrepository.com/artifact/com.fasterxml.jackson.core/jackson-databind -->
<dependency>
<groupId>com.fasterxml.jackson.core</groupId>
<artifactId>jackson-databind</artifactId>
<version>2.10.3</version>
</dependency>
<!-- https://mvnrepository.com/artifact/com.fasterxml.jackson.core/jackson-annotations -->
<dependency>
<groupId>com.fasterxml.jackson.core</groupId>
<artifactId>jackson-annotations</artifactId>
<version>2.10.3</version>
</dependency>
<!-- https://mvnrepository.com/artifact/commons-io/commons-io -->
<dependency>
<groupId>commons-io</groupId>
<artifactId>commons-io</artifactId>
<version>2.6</version>
</dependency>
<!-- https://mvnrepository.com/artifact/commons-fileupload/commons-fileupload -->
<dependency>
<groupId>commons-fileupload</groupId>
<artifactId>commons-fileupload</artifactId>
<version>1.4</version>
</dependency>
</dependencies>
</project>

web.xml

1
2
3
4
5
6
7
8
9
10
11
12
13
14
15
16
17
18
19
20
21
22
23
24
25
26
27
28
29
30
31
32
33
34
35
<?xml version="1.0" encoding="UTF-8"?>
<web-app xmlns="http://xmlns.jcp.org/xml/ns/javaee"
xmlns:xsi="http://www.w3.org/2001/XMLSchema-instance"
xsi:schemaLocation="http://xmlns.jcp.org/xml/ns/javaee http://xmlns.jcp.org/xml/ns/javaee/web-app_4_0.xsd"
version="4.0">

<servlet>
<servlet-name>springmvc</servlet-name>
<servlet-class>org.springframework.web.servlet.DispatcherServlet</servlet-class>
<init-param>
<param-name>contextConfigLocation</param-name>
<param-value>classpath:springmvc.xml</param-value>
</init-param>
</servlet>
<servlet-mapping>
<servlet-name>springmvc</servlet-name>
<url-pattern>/</url-pattern>
</servlet-mapping>
<filter>
<filter-name>encoding</filter-name>
<filter-class>org.springframework.web.filter.CharacterEncodingFilter</filter-class>
<init-param>
<param-name>encoding</param-name>
<param-value>UTF-8</param-value>
</init-param>
<init-param>
<param-name>forceEncoding</param-name>
<param-value>true</param-value>
</init-param>
</filter>
<filter-mapping>
<filter-name>encoding</filter-name>
<url-pattern>/*</url-pattern>
</filter-mapping>
</web-app>

springmvc.xml

1
2
3
4
5
6
7
8
9
10
11
12
13
14
15
16
17
18
19
20
21
<?xml version="1.0" encoding="UTF-8"?>
<beans xmlns="http://www.springframework.org/schema/beans"
xmlns:xsi="http://www.w3.org/2001/XMLSchema-instance"
xmlns:context="http://www.springframework.org/schema/context"
xmlns:mvc="http://www.springframework.org/schema/mvc"

xsi:schemaLocation="http://www.springframework.org/schema/beans http://www.springframework.org/schema/beans/spring-beans.xsd http://www.springframework.org/schema/context https://www.springframework.org/schema/context/spring-context.xsd http://www.springframework.org/schema/mvc https://www.springframework.org/schema/mvc/spring-mvc.xsd">
<mvc:default-servlet-handler></mvc:default-servlet-handler>
<mvc:annotation-driven></mvc:annotation-driven>
<context:component-scan base-package="com.oi"></context:component-scan>

<bean class="org.springframework.web.servlet.view.InternalResourceViewResolver">
<property name="prefix" value="/WEB-INF/page/"></property>
<property name="suffix" value=".jsp"></property>
</bean>

<bean id="multipartResolver" class="org.springframework.web.multipart.commons.CommonsMultipartResolver">
<property name="defaultEncoding" value="UTF-8"></property>
<property name="maxUploadSize" value="1024000"></property>
</bean>
</beans>

index.jsp

1
2
3
4
5
6
7
8
9
10
11
12
13
14
15
16
17
18
19
20
<%--
Created by IntelliJ IDEA.
User: root
Date: 2020/3/13
Time: 17:00
To change this template use File | Settings | File Templates.
--%>
<%@ page contentType="text/html;charset=UTF-8" language="java" %>
<html>
<head>
<title>$Title$</title>
</head>
<body>
<form action="testUpload" method="post" enctype="multipart/form-data">
文件: <input type="file" name="file"/><br><br>
描述: <input type="text" name="desc"/><br><br>
<input type="submit" value="提交"/>
</form>
</body>
</html>

UploadHandler.java

1
2
3
4
5
6
7
8
9
10
11
12
13
14
15
16
17
18
19
20
21
22
23
24
package com.oi.controller;

import org.springframework.stereotype.Controller;
import org.springframework.web.bind.annotation.RequestMapping;
import org.springframework.web.bind.annotation.RequestMethod;
import org.springframework.web.bind.annotation.RequestParam;
import org.springframework.web.multipart.MultipartFile;

import java.io.File;
import java.io.IOException;
import java.io.InputStream;

@Controller
public class UploadHandler {

@RequestMapping(value = "/testUpload", method = RequestMethod.POST)
public String testUpload(@RequestParam(value = "desc", required = false) String desc, @RequestParam("file") MultipartFile multipartFile) throws IOException {
System.out.println("desc : " + desc);
System.out.println("OriginalFilename : " + multipartFile.getOriginalFilename());
multipartFile.transferTo(new File("D:\\file\\"+multipartFile.getOriginalFilename()));

return "success"; //增加成功页面: /views/success.jsp
}
}

success.jsp

1
2
3
4
5
6
7
8
9
10
11
12
13
14
15
16
<%--
Created by IntelliJ IDEA.
User: root
Date: 2020/3/13
Time: 17:03
To change this template use File | Settings | File Templates.
--%>
<%@ page contentType="text/html;charset=UTF-8" language="java" %>
<html>
<head>
<title>Title</title>
</head>
<body>
success
</body>
</html>

如果是多文件上传,那么又改如何处理呢?

index.jsp

1
2
3
4
5
6
7
8
9
10
11
12
13
14
15
16
17
18
19
20
21
22
<%--
Created by IntelliJ IDEA.
User: root
Date: 2020/3/13
Time: 17:00
To change this template use File | Settings | File Templates.
--%>
<%@ page contentType="text/html;charset=UTF-8" language="java" %>
<html>
<head>
<title>$Title$</title>
</head>
<body>
<form action="testUpload" method="post" enctype="multipart/form-data">
文件: <input type="file" name="file"/><br><br>
描述: <input type="text" name="desc"/><br><br>
<input type="submit" value="提交"/>
</form>
</body>
</html>

UploadHandler.java

1
2
3
4
5
6
7
8
9
10
11
12
13
14
15
16
17
18
19
20
21
22
23
24
25
26
27
28
package com.oi.controller;

import org.springframework.stereotype.Controller;
import org.springframework.web.bind.annotation.RequestMapping;
import org.springframework.web.bind.annotation.RequestMethod;
import org.springframework.web.bind.annotation.RequestParam;
import org.springframework.web.multipart.MultipartFile;

import java.io.File;
import java.io.IOException;
import java.io.InputStream;

@Controller
public class UploadHandler {

@RequestMapping(value = "/testUpload", method = RequestMethod.POST)
public String testUpload(@RequestParam(value = "desc", required = false) String desc, @RequestParam("file") MultipartFile[] multipartFile) throws IOException {
System.out.println("desc : " + desc);
for (MultipartFile file : multipartFile) {
if (!file.isEmpty()) {
System.out.println("OriginalFilename : " + file.getOriginalFilename());
file.transferTo(new File("D:\\file\\" + file.getOriginalFilename()));
}
}

return "success"; //增加成功页面: /views/success.jsp
}
}

7、Springmvc拦截器

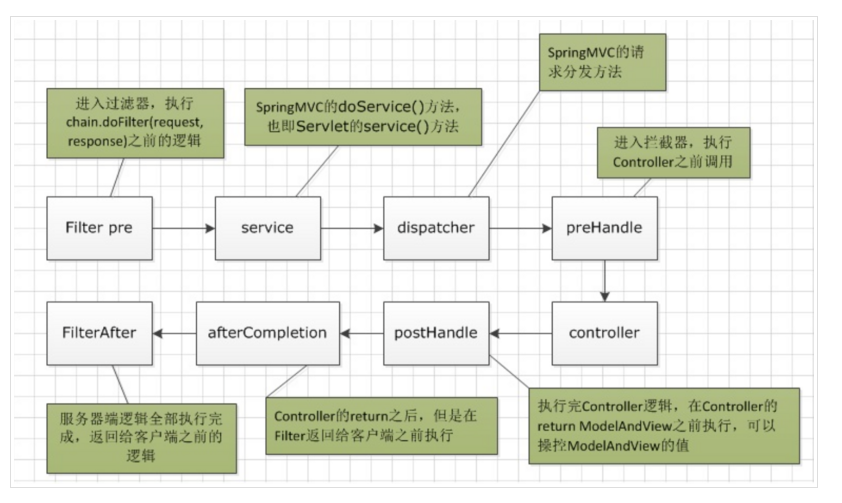
​ SpringMVC提供了拦截器机制,允许运行目标方法之前进行一些拦截工作或者目标方法运行之后进行一下其他相关的处理。自定义的拦截器必须实现HandlerInterceptor接口。

![image-20200313173442876](Spring MVC的进阶使用-2/handlerInterceptor.png)

preHandle():这个方法在业务处理器处理请求之前被调用,在该方法中对用户请求 request 进行处理。如果程序员决定该拦截器对请求进行拦截处理后还要调用其他的拦截器,或者是业务处理器去进行处理,则返回true;如果程序员决定不需要再调用其他的组件去处理请求,则返回false

postHandle():这个方法在业务处理器处理完请求后,但是DispatcherServlet 向客户端返回响应前被调用,在该方法中对用户请求request进行处理。

afterCompletion():这个方法在DispatcherServlet完全处理完请求后被调用,可以在该方法中进行一些资源清理的操作。

1、自定义第一个拦截器

MyFirstInterceptor.java

1
2
3
4
5
6
7
8
9
10
11
12
13
14
15
16
17
18
19
20
21
22
23
package com.oi.interceptor;


import org.springframework.web.servlet.HandlerInterceptor;
import org.springframework.web.servlet.ModelAndView;

import javax.servlet.http.HttpServletRequest;
import javax.servlet.http.HttpServletResponse;

public class MyFirstInterceptor implements HandlerInterceptor {
public boolean preHandle(HttpServletRequest request, HttpServletResponse response, Object handler) throws Exception {
System.out.println(this.getClass().getName()+"------->preHandle");
return true;
}

public void postHandle(HttpServletRequest request, HttpServletResponse response, Object handler, ModelAndView modelAndView) throws Exception {
System.out.println(this.getClass().getName()+"------->postHandle");
}

public void afterCompletion(HttpServletRequest request, HttpServletResponse response, Object handler, Exception ex) throws Exception {
System.out.println(this.getClass().getName()+"------->afterCompletion");
}
}

TestInterceptorController.java

1
2
3
4
5
6
7
8
9
10
11
12
13
14
package com.oi.controller;

import org.springframework.stereotype.Controller;
import org.springframework.web.bind.annotation.RequestMapping;

@Controller
public class TestInterceptorController {

@RequestMapping("test01")
public String test01(){
System.out.println("test01");
return "success";
}
}

springmvc.xml

1
2
3
4
5
6
7
8
9
10
11
12
13
14
15
16
17
18
19
<?xml version="1.0" encoding="UTF-8"?>
<beans xmlns="http://www.springframework.org/schema/beans"
xmlns:xsi="http://www.w3.org/2001/XMLSchema-instance"
xmlns:context="http://www.springframework.org/schema/context"
xmlns:mvc="http://www.springframework.org/schema/mvc"

xsi:schemaLocation="http://www.springframework.org/schema/beans http://www.springframework.org/schema/beans/spring-beans.xsd http://www.springframework.org/schema/context https://www.springframework.org/schema/context/spring-context.xsd http://www.springframework.org/schema/mvc https://www.springframework.org/schema/mvc/spring-mvc.xsd">
<mvc:default-servlet-handler></mvc:default-servlet-handler>
<mvc:annotation-driven></mvc:annotation-driven>
<context:component-scan base-package="com.oi"></context:component-scan>

<bean class="org.springframework.web.servlet.view.InternalResourceViewResolver">
<property name="prefix" value="/WEB-INF/page/"></property>
<property name="suffix" value=".jsp"></property>
</bean>
<mvc:interceptors>
<bean class="com.oi.interceptor.MyFirstInterceptor"></bean>
</mvc:interceptors>
</beans>

success.jsp

1
2
3
4
5
6
7
8
9
10
<%@ page contentType="text/html;charset=UTF-8" language="java" %>
<html>
<head>
<title>Title</title>
</head>
<body>
<% System.out.println("success.jsp");%>
success
</body>
</html>

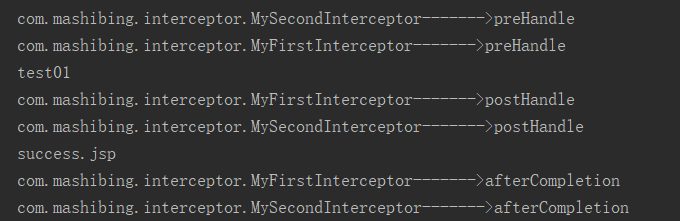
​ 通过运行结果能够发现拦截器的执行顺序如下:

​ 可以看到先执行拦截器的preHandle方法—-》执行目标方法—-》执行拦截器的postHandle方法—-》执行页面跳转—-》执行拦截器的afterCompletion方法

​ 在配置拦截器的时候有两个需要注意的点:

​ 1、如果prehandle方法返回值 为false,那么意味着不放行,那么就会造成后续的所有操作都中断

​ 2、如果执行到方法中出现异常,那么后续流程不会处理但是afterCompletion方法会执行

2、定义多个拦截器

​ 再添加另外一个拦截器

MySecondInterceptor.java

1
2
3
4
5
6
7
8
9
10
11
12
13
14
15
16
17
18
19
20
21
22
23
package com.oi.interceptor;


import org.springframework.web.servlet.HandlerInterceptor;
import org.springframework.web.servlet.ModelAndView;

import javax.servlet.http.HttpServletRequest;
import javax.servlet.http.HttpServletResponse;

public class MySecondInterceptor implements HandlerInterceptor {
public boolean preHandle(HttpServletRequest request, HttpServletResponse response, Object handler) throws Exception {
System.out.println(this.getClass().getName()+"------->preHandle");
return true;
}

public void postHandle(HttpServletRequest request, HttpServletResponse response, Object handler, ModelAndView modelAndView) throws Exception {
System.out.println(this.getClass().getName()+"------->postHandle");
}

public void afterCompletion(HttpServletRequest request, HttpServletResponse response, Object handler, Exception ex) throws Exception {
System.out.println(this.getClass().getName()+"------->afterCompletion");
}
}

看到如下执行顺序:

image-20200313182213954

调整两个拦截器的配置顺序:

![image-20200313182350929](Spring MVC的进阶使用-2/多个拦截器执行顺序2.png)

大家可以看到对应的效果,谁先执行取决于配置的顺序。

​ 拦截器的preHandle是按照顺序执行的

​ 拦截器的postHandle是按照逆序执行的

​ 拦截器的afterCompletion是按照逆序执行的

​ 如果执行的时候核心的业务代码出问题了,那么已经通过的拦截器的afterCompletion会接着执行。
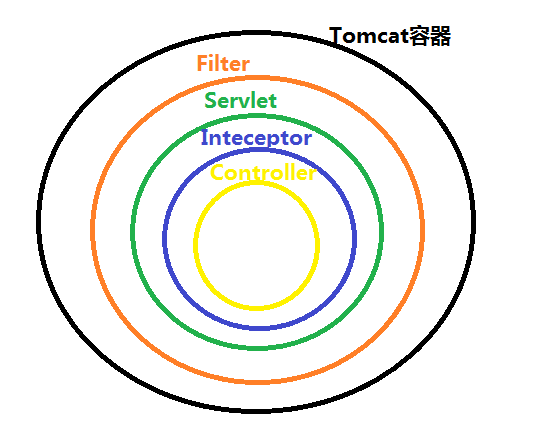
8、拦截器跟过滤器的区别

​ 1、过滤器是基于函数回调的,而拦截器是基于java反射的

​ 2、过滤器依赖于servlet容器,而拦截器不依赖与Servlet容器

​ 3、连接器几乎对所有的请求都起作用和,而拦截器只能对action请求起作用

​ 4、拦截器可以访问action的上下文,而过滤器不可以

​ 5、在action的生命周期中,拦截器可以多次调用,而过滤器只能在容器初始化的时候调用一次

![image-20200313190146352](Spring MVC的进阶使用-2/拦截器跟过滤器的执行流程.png)

![image-20200313190309273](Spring MVC的进阶使用-2/拦截器和过滤器的包含关系.png)

9、SpringMVC的国际化操作

​ 在日常工作中,如果你的网站需要给不同语言地区的人进行查看,此时就需要使用国际化的基本操作,springmvc的国际化操作比较容易。

index.jsp

1
2
3
4
5
6
7
8
9
10
11
12
13
14
15
16
<%--
Created by IntelliJ IDEA.
User: root
Date: 2020/3/13
Time: 17:00
To change this template use File | Settings | File Templates.
--%>
<%@ page contentType="text/html;charset=UTF-8" language="java" %>
<html>
<head>
<title>$Title$</title>
</head>
<body>
<a href="i18n">国际化页面登录</a>
</body>
</html>

login.jsp

1
2
3
4
5
6
7
8
9
10
11
12
13
14
15
<%@ page contentType="text/html;charset=UTF-8" language="java" %>
<%@ taglib prefix="fmt" uri="http://java.sun.com/jsp/jstl/fmt"%>
<html>
<head>
<title>Title</title>
</head>
<body>
<h1><fmt:message key="welcomeinfo"/></h1>
<form action="login" method="post" >
<fmt:message key="username"/>: <input type="text" name="username"/><br><br>
<fmt:message key="password"/>: <input type="password" name="password"/><br><br>
<input type="submit" value="<fmt:message key="loginBtn"/>"/>
</form>
</body>
</html>

I18nController.java

1
2
3
4
5
6
7
8
9
10
11
12
13
package com.oi.controller;

import org.springframework.stereotype.Controller;
import org.springframework.web.bind.annotation.RequestMapping;

@Controller
public class I18nController {

@RequestMapping("i18n")
public String i18n(){
return "login";
}
}

login_en_US.properties

1
2
3
4
welcomeinfo=welcome to oi.com
username=USERNAME
password=PASSWORD
loginBtn=LOGIN

login_zh_CN.properties

1
2
3
4
welcomeinfo=欢迎进入马士兵教育
username=用户名
password=密码
loginBtn=登录

springmvc.xml

1
2
3
4
5
6
7
8
9
10
11
12
13
14
15
16
17
18
19
<?xml version="1.0" encoding="UTF-8"?>
<beans xmlns="http://www.springframework.org/schema/beans"
xmlns:xsi="http://www.w3.org/2001/XMLSchema-instance"
xmlns:context="http://www.springframework.org/schema/context"
xmlns:mvc="http://www.springframework.org/schema/mvc"

xsi:schemaLocation="http://www.springframework.org/schema/beans http://www.springframework.org/schema/beans/spring-beans.xsd http://www.springframework.org/schema/context https://www.springframework.org/schema/context/spring-context.xsd http://www.springframework.org/schema/mvc https://www.springframework.org/schema/mvc/spring-mvc.xsd">
<mvc:default-servlet-handler></mvc:default-servlet-handler>
<mvc:annotation-driven></mvc:annotation-driven>
<context:component-scan base-package="com.oi"></context:component-scan>

<bean class="org.springframework.web.servlet.view.InternalResourceViewResolver">
<property name="prefix" value="/WEB-INF/page/"></property>
<property name="suffix" value=".jsp"></property>
</bean>
<bean id="messageSource" class="org.springframework.context.support.ResourceBundleMessageSource">
<property name="basename" value="login"></property>
</bean>
</beans>

​ 其实SpringMVC中国际化的处理非常简单,就是按照浏览器所带来的语言信息决定的。

1
Locale locale = request.getLocale();//获取浏览器的区域信息

在DispatcherServlet中会包含一个组件,用来专门获取区域信息

![image-20200313193757666](Spring MVC的进阶使用-2/国际化1.png)

![image-20200313193823121](Spring MVC的进阶使用-2/国际化2.png)

![image-20200313194137103](Spring MVC的进阶使用-2/国际化3.png)

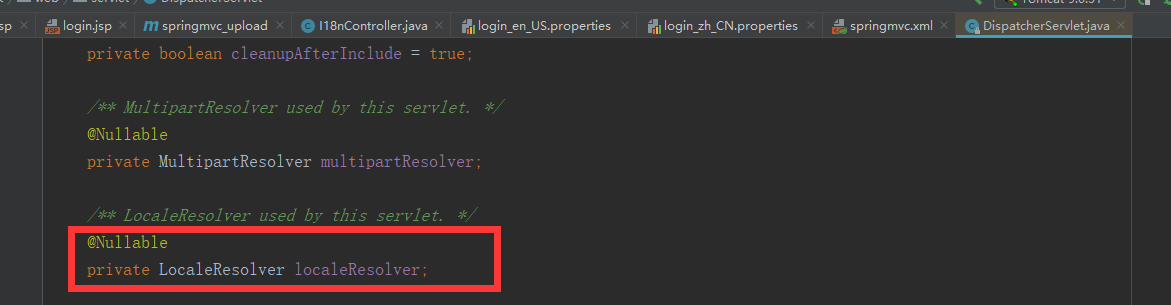
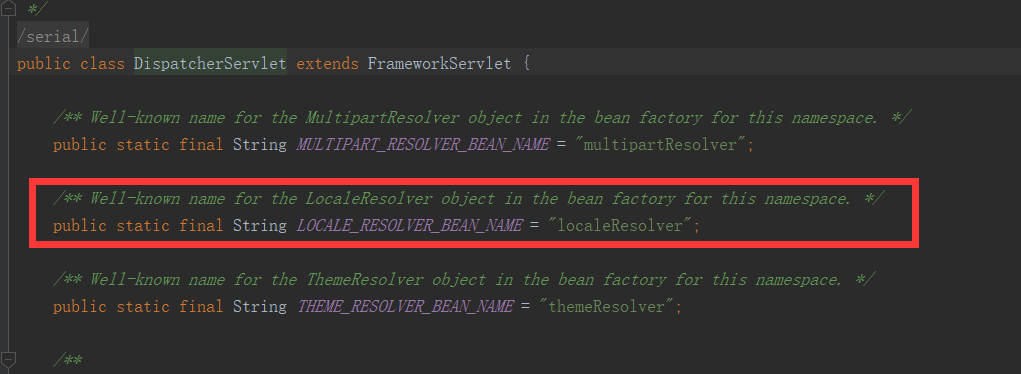
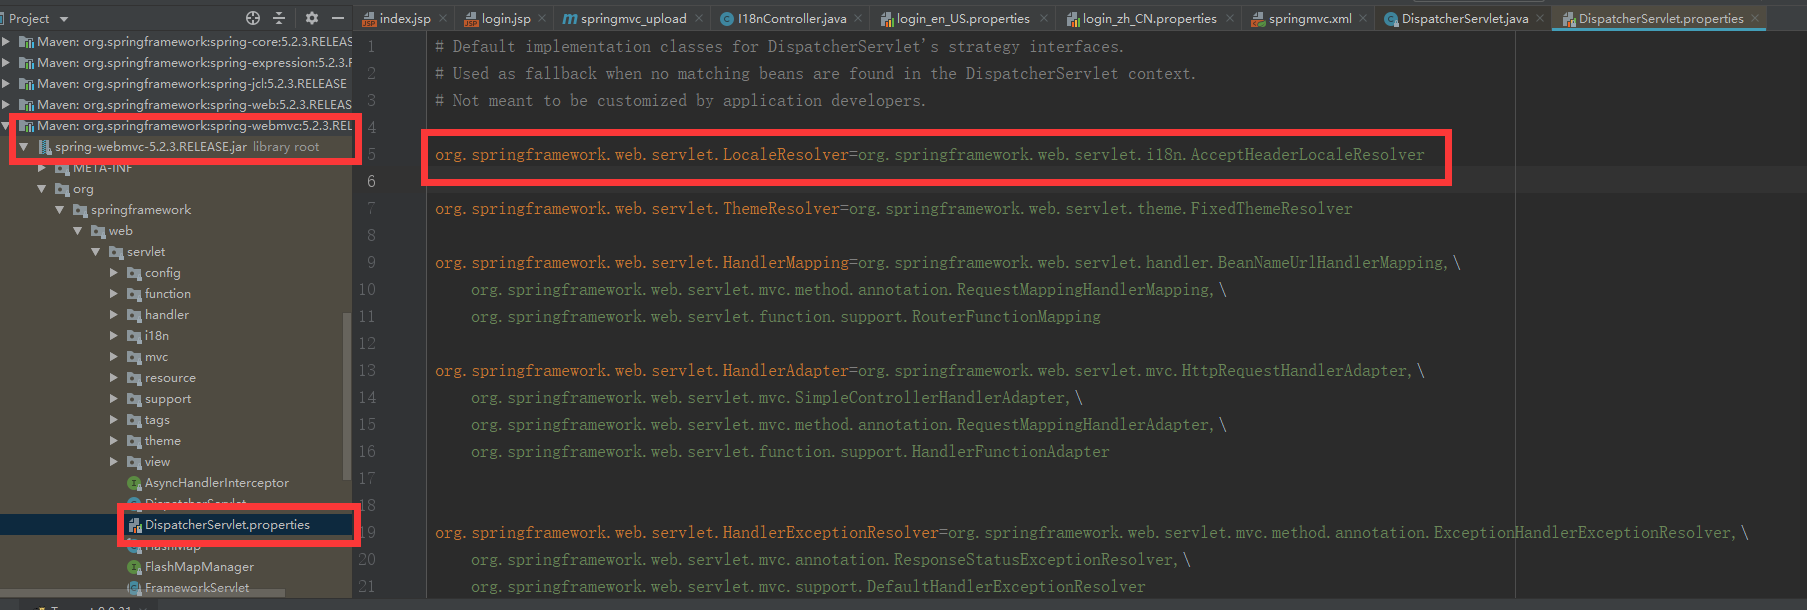
通过图片能够发现,默认调用的是org.springframework.web.servlet.i18n.AcceptHeaderLocaleResolver类

![image-20200313194436614](Spring MVC的进阶使用-2/国际化4.png)

在程序中可以获取Locale的相关信息:

1
2
3
4
5
6
7
8
9
10
11
12
13
14
15
16
17
18
19
20
21
22
23
package com.oi.controller;

import org.springframework.beans.factory.annotation.Autowired;
import org.springframework.context.MessageSource;
import org.springframework.stereotype.Controller;
import org.springframework.web.bind.annotation.RequestMapping;

import java.util.Locale;

@Controller
public class I18nController {

@Autowired
private MessageSource messageSource;

@RequestMapping("i18n")
public String i18n(Locale locale){
System.out.println(locale);
String username = messageSource.getMessage("username", null, locale);
System.out.println(username);
return "login";
}
}

10、通过超链接来切换国际化

login.jsp

1
2
3
4
5
6
7
8
9
10
11
12
13
14
15
16
<%@ page contentType="text/html;charset=UTF-8" language="java" %>
<%@ taglib prefix="fmt" uri="http://java.sun.com/jsp/jstl/fmt"%>
<html>
<head>
<title>Title</title>
</head>
<body>
<h1><fmt:message key="welcomeinfo"/></h1>
<form action="login" method="post" >
<fmt:message key="username"/>: <input type="text" name="username"/><br><br>
<fmt:message key="password"/>: <input type="password" name="password"/><br><br>
<input type="submit" value="<fmt:message key="loginBtn"/>"/>
<a href="i18n?locale=zh_CN">中文</a><a href="i18n?locale=en_US">英文</a>
</form>
</body>
</html>

MyLocaleResolver.java

1
2
3
4
5
6
7
8
9
10
11
12
13
14
15
16
17
18
19
20
21
22
23
24
25
26
27
28
29
30
31
32
33
34
35
36
37
38
package com.oi;

import org.springframework.web.servlet.LocaleResolver;

import javax.servlet.http.HttpServletRequest;
import javax.servlet.http.HttpServletResponse;
import java.util.Locale;

public class MyLocaleResolver implements LocaleResolver {
/**
* 解析并返回locale
* @param request
* @return
*/
@Override
public Locale resolveLocale(HttpServletRequest request) {
Locale locale = null;
String localeStr = request.getParameter("locale");
if(localeStr!=null && ! "".equals(localeStr)){
locale = new Locale(localeStr.split("_")[0],localeStr.split("_")[1]);
}else{
locale = request.getLocale();
}
return locale;
}

/**
* 不支持设置locale的信息
* @param request
* @param response
* @param locale
*/
@Override
public void setLocale(HttpServletRequest request, HttpServletResponse response, Locale locale) {
throw new UnsupportedOperationException(
"Cannot change HTTP accept header - use a different locale resolution strategy");
}
}

springmvc.xml

1
2
3
4
5
6
7
8
9
10
11
12
13
14
15
16
17
18
19
20
21
<?xml version="1.0" encoding="UTF-8"?>
<beans xmlns="http://www.springframework.org/schema/beans"
xmlns:xsi="http://www.w3.org/2001/XMLSchema-instance"
xmlns:context="http://www.springframework.org/schema/context"
xmlns:mvc="http://www.springframework.org/schema/mvc"

xsi:schemaLocation="http://www.springframework.org/schema/beans http://www.springframework.org/schema/beans/spring-beans.xsd http://www.springframework.org/schema/context https://www.springframework.org/schema/context/spring-context.xsd http://www.springframework.org/schema/mvc https://www.springframework.org/schema/mvc/spring-mvc.xsd">
<mvc:default-servlet-handler></mvc:default-servlet-handler>
<mvc:annotation-driven></mvc:annotation-driven>
<context:component-scan base-package="com.oi"></context:component-scan>

<bean class="org.springframework.web.servlet.view.InternalResourceViewResolver">
<property name="prefix" value="/WEB-INF/page/"></property>
<property name="suffix" value=".jsp"></property>
</bean>
<bean id="messageSource" class="org.springframework.context.support.ResourceBundleMessageSource">
<property name="basename" value="login"></property>
</bean>
<!--配置区域信息解析器-->
<bean id="localeResolver" class="com.oi.MyLocaleResolver"></bean>
</beans>

除了可以自定义区域信息解析器之外,我们还可以使用SpringMVC中自带的SessionLocaleResolver:

I18nController.java

1
2
3
4
5
6
7
8
9
10
11
12
13
14
15
16
17
18
19
20
21
22
23
24
25
26
27
28
29
30
31
package com.oi.controller;

import org.springframework.beans.factory.annotation.Autowired;
import org.springframework.context.MessageSource;
import org.springframework.stereotype.Controller;
import org.springframework.web.bind.annotation.RequestMapping;
import org.springframework.web.bind.annotation.RequestParam;
import org.springframework.web.servlet.i18n.SessionLocaleResolver;

import javax.servlet.http.HttpSession;
import java.util.Locale;

@Controller
public class I18nController {

@Autowired
private MessageSource messageSource;

@RequestMapping("i18n")
public String i18n(@RequestParam(value = "locale",defaultValue = "zh_CN") String localeStr,Locale locale, HttpSession session){

Locale l = null;
if(localeStr!=null && ! "".equals(localeStr)){
l = new Locale(localeStr.split("_")[0],localeStr.split("_")[1]);
}else{
l = locale;
}
session.setAttribute(SessionLocaleResolver.class.getName() + ".LOCALE",l);
return "login";
}
}

springmvc.xml

1
2
3
4
5
6
7
8
9
10
11
12
13
14
15
16
17
18
19
20
21
22
<?xml version="1.0" encoding="UTF-8"?>
<beans xmlns="http://www.springframework.org/schema/beans"
xmlns:xsi="http://www.w3.org/2001/XMLSchema-instance"
xmlns:context="http://www.springframework.org/schema/context"
xmlns:mvc="http://www.springframework.org/schema/mvc"

xsi:schemaLocation="http://www.springframework.org/schema/beans http://www.springframework.org/schema/beans/spring-beans.xsd http://www.springframework.org/schema/context https://www.springframework.org/schema/context/spring-context.xsd http://www.springframework.org/schema/mvc https://www.springframework.org/schema/mvc/spring-mvc.xsd">
<mvc:default-servlet-handler></mvc:default-servlet-handler>
<mvc:annotation-driven></mvc:annotation-driven>
<context:component-scan base-package="com.oi"></context:component-scan>

<bean class="org.springframework.web.servlet.view.InternalResourceViewResolver">
<property name="prefix" value="/WEB-INF/page/"></property>
<property name="suffix" value=".jsp"></property>
</bean>
<bean id="messageSource" class="org.springframework.context.support.ResourceBundleMessageSource">
<property name="basename" value="login"></property>
</bean>
<!--配置区域信息解析器-->
<!-- <bean id="localeResolver" class="com.oi.MyLocaleResolver"></bean>-->
<bean id="localeResolver" class="org.springframework.web.servlet.i18n.SessionLocaleResolver"></bean>
</beans>

使用LocaleChangeInterceptor来实现国际化:

springmvc.xml

1
2
3
4
5
6
7
8
9
10
11
12
13
14
15
16
17
18
19
20
21
22
23
24
25
26
27
28
29
30
31
32
33
34
<?xml version="1.0" encoding="UTF-8"?>
<beans xmlns="http://www.springframework.org/schema/beans"
xmlns:xsi="http://www.w3.org/2001/XMLSchema-instance"
xmlns:context="http://www.springframework.org/schema/context"
xmlns:mvc="http://www.springframework.org/schema/mvc"

xsi:schemaLocation="http://www.springframework.org/schema/beans http://www.springframework.org/schema/beans/spring-beans.xsd http://www.springframework.org/schema/context https://www.springframework.org/schema/context/spring-context.xsd http://www.springframework.org/schema/mvc https://www.springframework.org/schema/mvc/spring-mvc.xsd">
<mvc:default-servlet-handler></mvc:default-servlet-handler>
<mvc:annotation-driven></mvc:annotation-driven>
<context:component-scan base-package="com.oi"></context:component-scan>

<bean class="org.springframework.web.servlet.view.InternalResourceViewResolver">
<property name="prefix" value="/WEB-INF/page/"></property>
<property name="suffix" value=".jsp"></property>
</bean>

<!-- <bean id="multipartResolver" class="org.springframework.web.multipart.commons.CommonsMultipartResolver">-->
<!-- <property name="defaultEncoding" value="UTF-8"></property>-->
<!-- <property name="maxUploadSize" value="1024000"></property>-->
<!-- </bean>-->
<!-- <mvc:interceptors>-->
<!-- <bean class="com.oi.interceptor.MySecondInterceptor"></bean>-->
<!-- <bean class="com.oi.interceptor.MyFirstInterceptor"></bean>-->
<!-- </mvc:interceptors>-->
<bean id="messageSource" class="org.springframework.context.support.ResourceBundleMessageSource">
<property name="basename" value="login"></property>
</bean>
<!--配置区域信息解析器-->
<!-- <bean id="localeResolver" class="com.oi.MyLocaleResolver"></bean>-->
<bean id="localeResolver" class="org.springframework.web.servlet.i18n.SessionLocaleResolver"></bean>
<mvc:interceptors>
<bean class="org.springframework.web.servlet.i18n.LocaleChangeInterceptor"></bean>
</mvc:interceptors>
</beans>

I18nController.java

1
2
3
4
5
6
7
8
9
10
11
12
13
14
15
16
17
18
19
20
21
22
23
24
25
26
27
28
29
30
31
package com.oi.controller;

import org.springframework.beans.factory.annotation.Autowired;
import org.springframework.context.MessageSource;
import org.springframework.stereotype.Controller;
import org.springframework.web.bind.annotation.RequestMapping;
import org.springframework.web.bind.annotation.RequestParam;
import org.springframework.web.servlet.i18n.SessionLocaleResolver;

import javax.servlet.http.HttpSession;
import java.util.Locale;

@Controller
public class I18nController {

@Autowired
private MessageSource messageSource;

@RequestMapping("i18n")
public String i18n(@RequestParam(value = "locale",defaultValue = "zh_CN") String localeStr,Locale locale, HttpSession session){

// Locale l = null;
// if(localeStr!=null && ! "".equals(localeStr)){
// l = new Locale(localeStr.split("_")[0],localeStr.split("_")[1]);
// }else{
// l = locale;
// }
// session.setAttribute(SessionLocaleResolver.class.getName() + ".LOCALE",l);
return "login";
}
}

11、SpringMVC异常处理机制

​ 在SpringMVC中拥有一套非常强大的异常处理机制,SpringMVC通过HandlerExceptionResolver处理程序的异常,包括请求映射,数据绑定以及目标方法的执行时发生的异常。

![image-20200313204210754](Spring MVC的进阶使用-2/异常处理实现的子类.png)

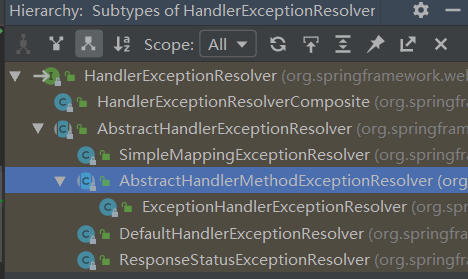
在容器启动好,进入DispatcherServlet之后,会对HandlerExceptionResolver进行初始化操作:

![image-20200313204557902](Spring MVC的进阶使用-2/异常初始化.png)

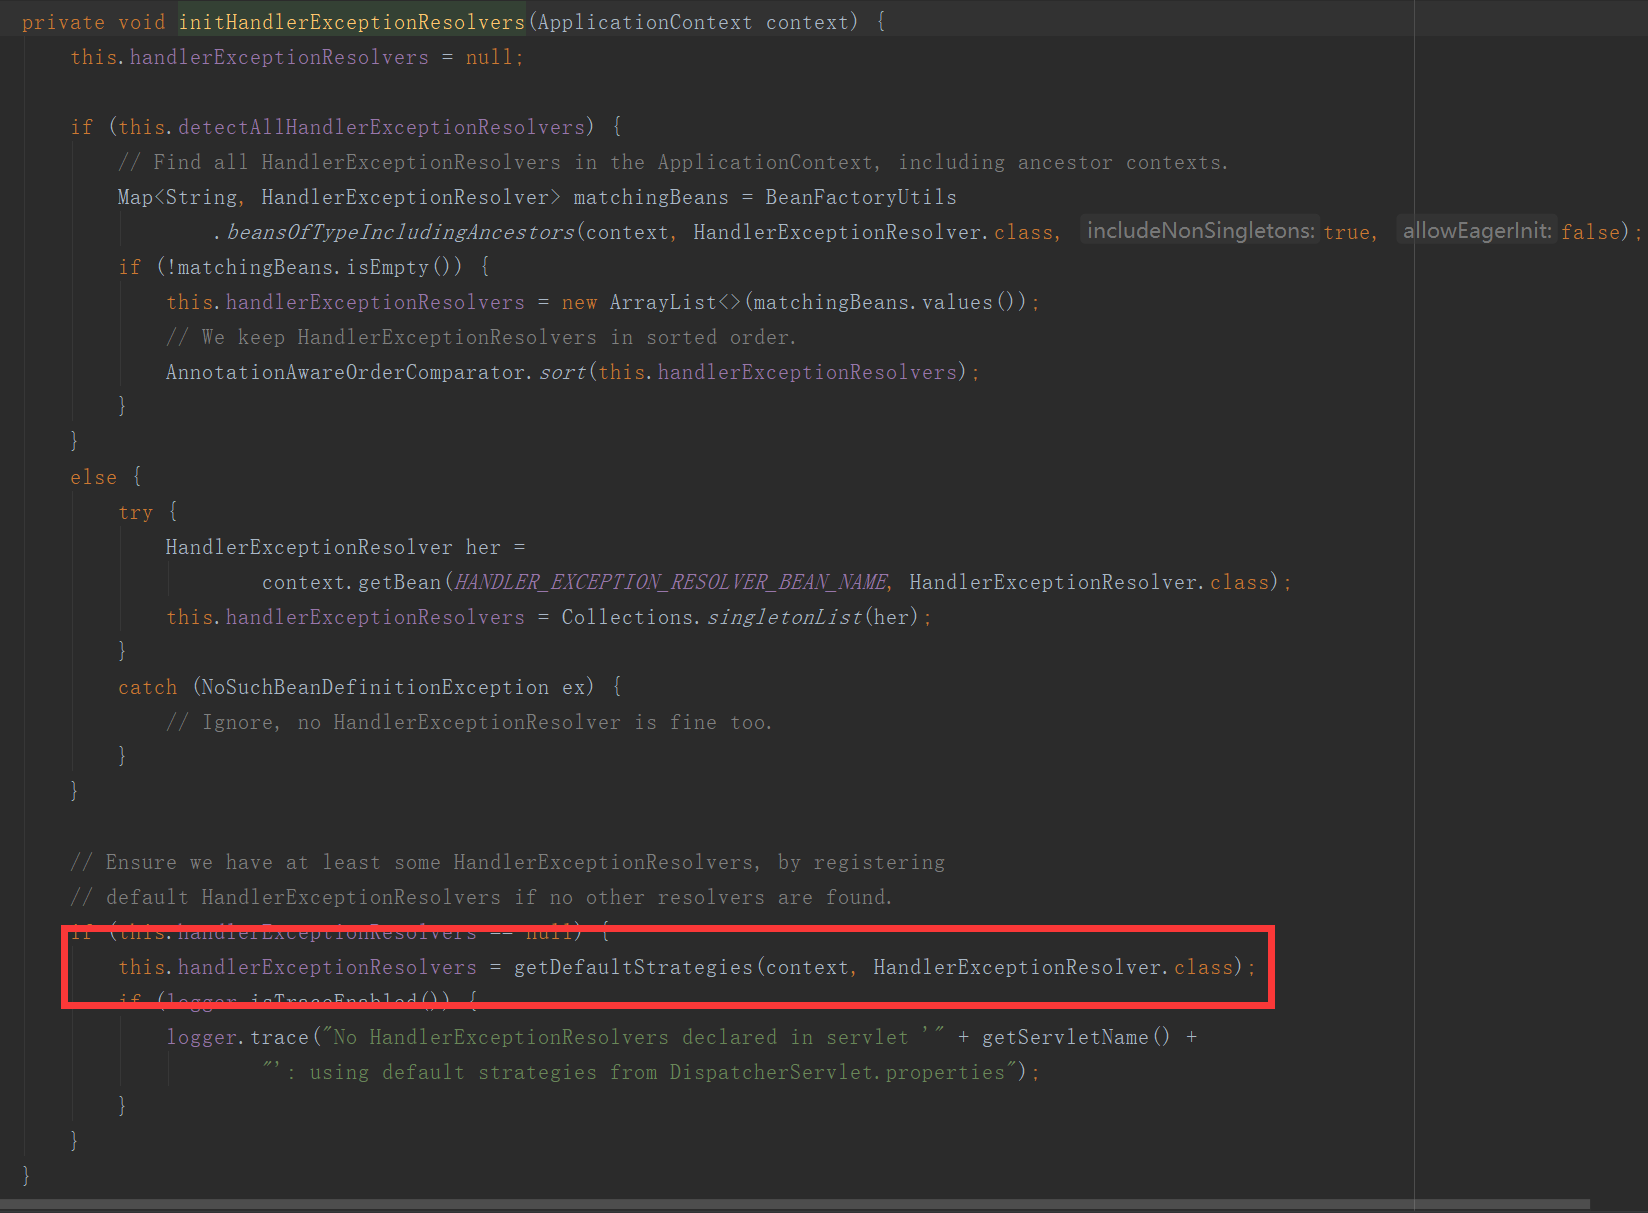
会默认的从DispatcherServlet.properties中找到对应的异常处理类:

1
2
3
4
5
6
7
8
#默认的处理类
org.springframework.web.servlet.HandlerExceptionResolver=
#处理@ExceptionHandler
org.springframework.web.servlet.mvc.method.annotation.ExceptionHandlerExceptionResolver,\
#处理@ResponseStatus,给自定义异常使用
org.springframework.web.servlet.mvc.annotation.ResponseStatusExceptionResolver,\
#判断是否是SpringMVC自带异常
org.springframework.web.servlet.mvc.support.DefaultHandlerExceptionResolver

自己定义异常处理方式:

index.jsp

1
2
3
4
5
6
7
8
9
<%@ page contentType="text/html;charset=UTF-8" language="java" %>
<html>
<head>
<title>$Title$</title>
</head>
<body>
<a href="exception1">自己处理异常</a>
</body>
</html>

ExceptionController.java

1
2
3
4
5
6
7
8
9
10
11
12
13
14
15
16
17
18
19
20
21
22
23
24
25
26
27
package com.oi.controller;

import org.springframework.stereotype.Controller;
import org.springframework.web.bind.annotation.ExceptionHandler;
import org.springframework.web.bind.annotation.RequestMapping;
import org.springframework.web.servlet.ModelAndView;

import javax.jws.WebParam;

@Controller
public class ExceptionController {

@RequestMapping("exception1")
public String exception(){
System.out.println("exception.......");
System.out.println(10/0);
return "success";
}

@ExceptionHandler(value = {ArithmeticException.class})
public ModelAndView handlerException(Exception exception){
ModelAndView mv = new ModelAndView();
mv.setViewName("error");
mv.addObject("ex",exception);
return mv;
}
}

error.jsp

1
2
3
4
5
6
7
8
9
10
<%@ page contentType="text/html;charset=UTF-8" language="java" %>
<html>
<head>
<title>Title</title>
</head>
<body>
我的出错页面:
错误信息:${ex}
</body>
</html>

​ 在一个类中可能会包含多个异常的处理方法,在不同的方法上可以使用不同范围的异常,在查找的时候会优先调用范围小的异常处理;

1
2
3
4
5
6
7
8
9
10
11
12
13
14
15
16
17
18
19
20
21
22
23
24
25
26
27
28
29
30
31
32
33
34
35
36
37
package com.oi.controller;

import org.springframework.stereotype.Controller;
import org.springframework.web.bind.annotation.ExceptionHandler;
import org.springframework.web.bind.annotation.RequestMapping;
import org.springframework.web.servlet.ModelAndView;

import javax.jws.WebParam;

@Controller
public class ExceptionController {

@RequestMapping("exception1")
public String exception(){
System.out.println("exception.......");
System.out.println(10/0);
return "success";
}

@ExceptionHandler(value = {ArithmeticException.class})
public ModelAndView handlerException1(Exception exception){
System.out.println("handlerException1........");
ModelAndView mv = new ModelAndView();
mv.setViewName("error");
mv.addObject("ex",exception);
return mv;
}

@ExceptionHandler(value = {Exception.class})
public ModelAndView handlerException2(Exception exception){
System.out.println("handlerException2........");
ModelAndView mv = new ModelAndView();
mv.setViewName("error");
mv.addObject("ex",exception);
return mv;
}
}

​ 在不同的类中可能会包含不同的异常处理,因此我们需要定义一个全局的异常控制器,使用@ControllerAdvice注解标注,如果本类跟全局都有相关异常的处理,那么会优先使用本类的。

1
2
3
4
5
6
7
8
9
10
11
12
13
14
15
16
17
package com.oi.controller;

import org.springframework.web.bind.annotation.ControllerAdvice;
import org.springframework.web.bind.annotation.ExceptionHandler;
import org.springframework.web.servlet.ModelAndView;

@ControllerAdvice
public class MyGlobalExceptionHandler {
@ExceptionHandler(value = {ArithmeticException.class})
public ModelAndView handlerException1(Exception exception){
System.out.println("handlerException1........");
ModelAndView mv = new ModelAndView();
mv.setViewName("error");
mv.addObject("ex",exception);
return mv;
}
}

@ResponseStatus的使用:

​ @ResponseStatus可以标注到方法上,但是标注在方法之后可能导致该方法无法被访问,因此更多的是在自定义类上

1
2
3
4
5
6
7
8
9
10
11
12
13
14
15
16
17
18
19
20
21
package com.oi.controller;

import org.springframework.http.HttpStatus;
import org.springframework.stereotype.Controller;
import org.springframework.web.bind.annotation.ExceptionHandler;
import org.springframework.web.bind.annotation.RequestMapping;
import org.springframework.web.bind.annotation.ResponseStatus;
import org.springframework.web.servlet.ModelAndView;

import javax.jws.WebParam;

@Controller
public class ExceptionController {

@ResponseStatus(reason = "不知道什么原因,反正错误",value = HttpStatus.NOT_ACCEPTABLE)
@RequestMapping("exception1")
public String exception(){
System.out.println("exception.......");
return "success";
}
}

​ @ResponseStatus作用在类上

UserNameException.java

1
2
3
4
5
6
7
8
package com.oi.controller;

import org.springframework.http.HttpStatus;
import org.springframework.web.bind.annotation.ResponseStatus;

@ResponseStatus(reason = "名字不是admin",value = HttpStatus.NOT_ACCEPTABLE)
public class UserNameException extends RuntimeException {
}

ExceptionController.java

1
2
3
4
5
6
7
8
9
10
11
12
13
14
15
16
17
18
19
20
21
22
23
24
25
26
27
28
package com.oi.controller;

import org.springframework.http.HttpStatus;
import org.springframework.stereotype.Controller;
import org.springframework.web.bind.annotation.ExceptionHandler;
import org.springframework.web.bind.annotation.RequestMapping;
import org.springframework.web.bind.annotation.ResponseStatus;
import org.springframework.web.servlet.ModelAndView;

import javax.jws.WebParam;

@Controller
public class ExceptionController {
@RequestMapping("exception1")
public String exception(){
System.out.println("exception.......");
return "success";
}
@RequestMapping("exception2")
public String exception2(String username){
System.out.println("exception2222.......");
if ("admin".equals(username)){
return "success";
}else{
throw new UserNameException();
}
}
}

springmvc自定义的异常:

index.jsp

1
2
3
4
5
6
7
8
9
10
11
12
13
14
15
16
17
18
<%--
Created by IntelliJ IDEA.
User: root
Date: 2020/3/13
Time: 17:00
To change this template use File | Settings | File Templates.
--%>
<%@ page contentType="text/html;charset=UTF-8" language="java" %>
<html>
<head>
<title>$Title$</title>
</head>
<body>
<a href="exception1">自己处理异常</a>
<a href="exception2?username=zhangsan">自定义异常处理</a>
<a href="exception3">Springmvc自己异常处理</a>
</body>
</html>

ExceptionController.java

1
2
3
4
5
6
7
8
9
10
11
12
13
14
15
16
17
18
19
20
21
22
23
24
25
26
27
28
29
30
31
32
33
34
35
36
package com.oi.controller;

import org.springframework.http.HttpStatus;
import org.springframework.stereotype.Controller;
import org.springframework.web.bind.annotation.ExceptionHandler;
import org.springframework.web.bind.annotation.RequestMapping;
import org.springframework.web.bind.annotation.RequestMethod;
import org.springframework.web.bind.annotation.ResponseStatus;
import org.springframework.web.servlet.ModelAndView;

import javax.jws.WebParam;

@Controller
public class ExceptionController {

@RequestMapping("exception1")
public String exception(){
System.out.println("exception.......");
return "success";
}
@RequestMapping("exception2")
public String exception2(String username){
System.out.println("exception2222.......");
if ("admin".equals(username)){
return "success";
}else{
throw new UserNameException();
}
}

@RequestMapping(value = "exception3",method = RequestMethod.POST)
public String exception3(String username){
System.out.println("exception3.......");
return "success";
}
}