Spring MVC源码解析

Spring MVC源码解析

​ 在讲解springmvc之前,其实是需要大家了解一点tomcat的源码知识的,但是大部分的初学者还只停留在应用的层面,所以,下面展示tomcat容器初始化的流程图和加载servlet的流程图,大家只需要先记住他们的执行顺序即可,等后续开始tomcat源码之后我们再做下一步深入了解。
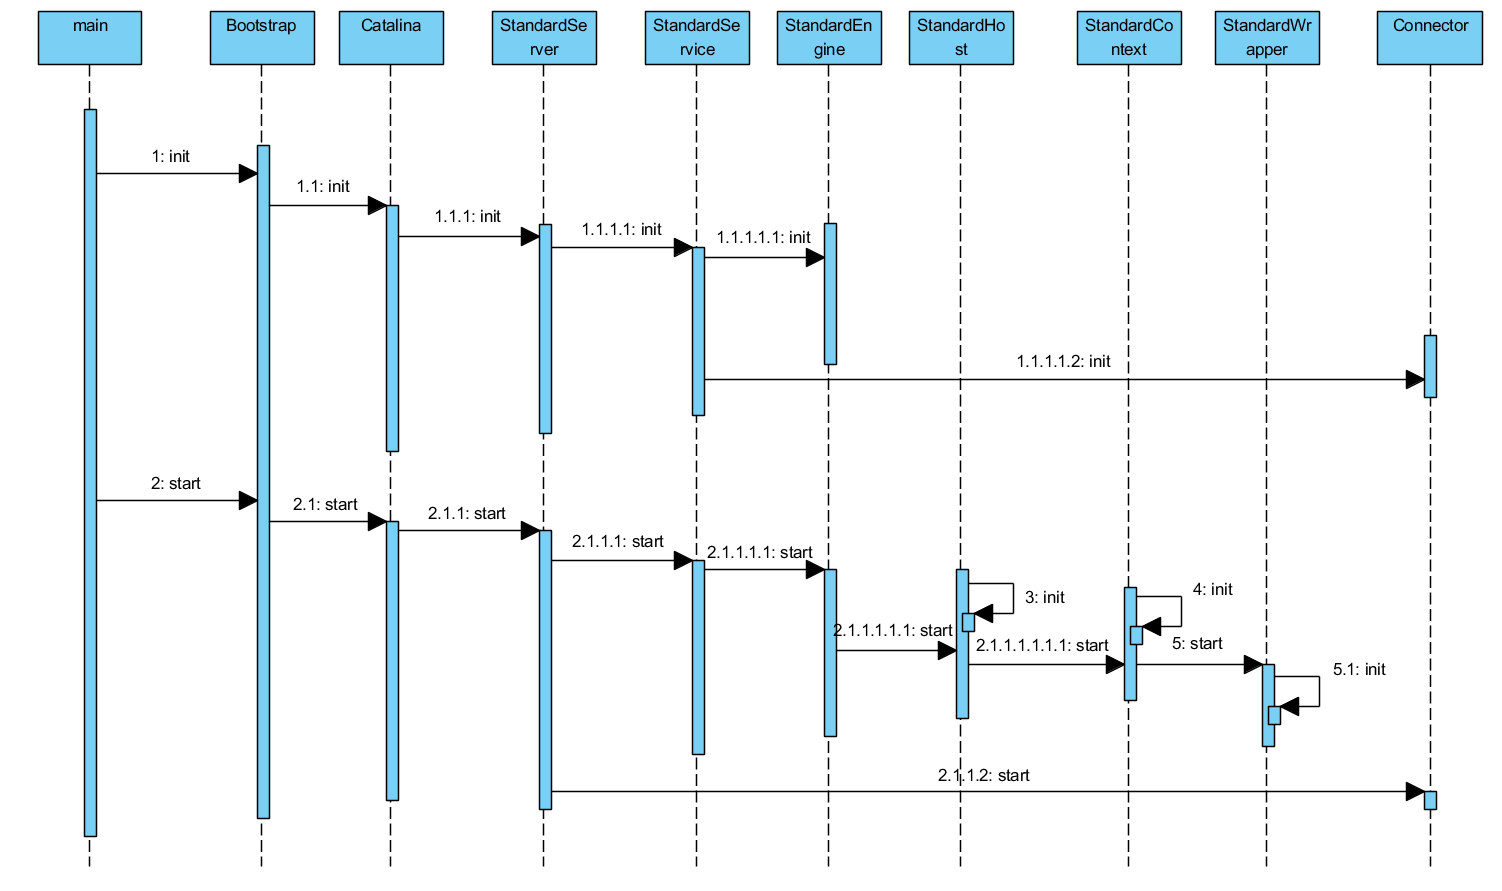
1、Tomcat容器初始化流程图

![img](Spring MVC源码解析/tomcat容器初始化流程图.png)

2、tomcat加载servlet流程图

![img](Spring MVC源码解析/加载servlet流程图.png)

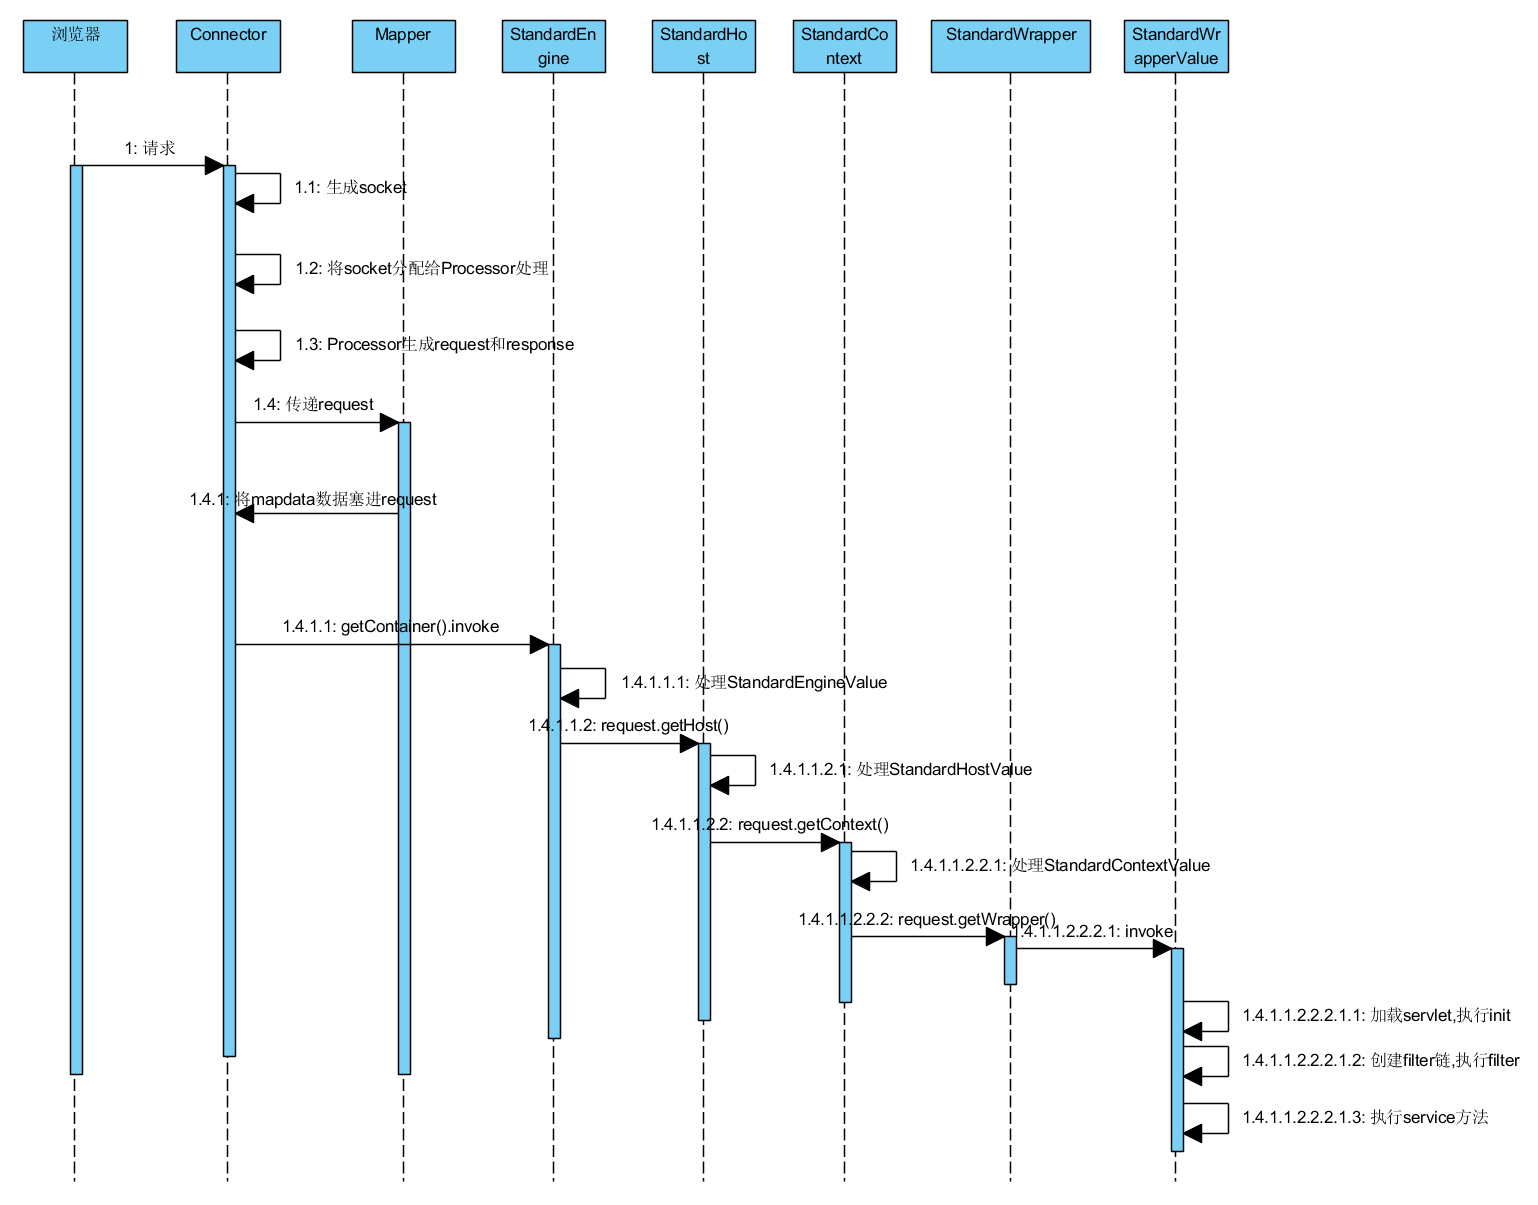
从上述流程开始看起,我们发现最终会调用Servlet的init方法,SpringMVC中最核心的类就是DispatcherServlet,因此需要找到init方法。

1、DispatcherServlet的初始化

DispatcherServlet的类图:

![image-20200314005616939](Spring MVC源码解析/DispatcherServlet类图.png)

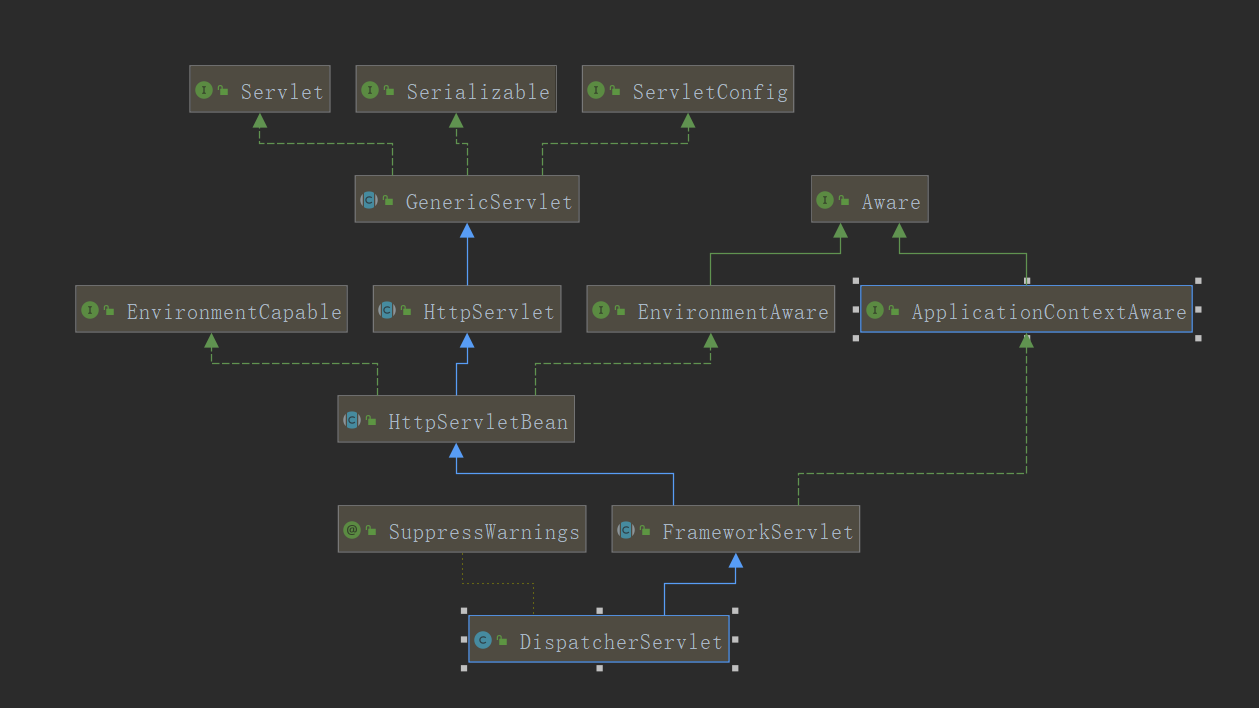
​ 可以看到,DispatcherServlet继承自HttpServlet,它的本质就是一个Servlet,但是此类中并没有init方法,因此要去父类中进行查找,最终在HttpServletBean类中重写了父类GenericServlet的init方法。因此当tomcat容器启动的时候会调用init方法开始执行,中间会经历N多个环节,此处不需要了解,唯一需要注意的一个点,就在于SpringMVC的组件会调用DispatcherServlet的组件进行初始化工作,这些初始化工作会完成对于九大组件的初始化,这个初始化会从DispatcherServlet.properties文件中进行相应的属性值加载。

HttpServletBean———init()

1
2
3
4
5
6
7
8
9
10
11
12
13
14
15
16
17
18
19
20
21
22
23
24
25
26
27
28
public final void init() throws ServletException {

// Set bean properties from init parameters.
// 将web.xml文件中初始化参数设置到bean中,requiredProperties为必须参数
PropertyValues pvs = new ServletConfigPropertyValues(getServletConfig(), this.requiredProperties);
if (!pvs.isEmpty()) {
try {
//将DispatcherServlet类添加到BeanWrapper的包装类中
BeanWrapper bw = PropertyAccessorFactory.forBeanPropertyAccess(this);
ResourceLoader resourceLoader = new ServletContextResourceLoader(getServletContext());
bw.registerCustomEditor(Resource.class, new ResourceEditor(resourceLoader, getEnvironment()));
//对DispatcherServlet进行初始化工作
initBeanWrapper(bw);
//将配置的初始化值设置到DispatcherServlet中
bw.setPropertyValues(pvs, true);
}
catch (BeansException ex) {
if (logger.isErrorEnabled()) {
logger.error("Failed to set bean properties on servlet '" + getServletName() + "'", ex);
}
throw ex;
}
}

// Let subclasses do whatever initialization they like.
// 模板方法,子类初始化的入口方法
initServletBean();
}

调用子类方法实现初始化BeanServlet

FrameworlServlet——initServletBean

1
2
3
4
5
6
7
8
9
10
11
12
13
14
15
16
17
18
19
20
21
22
23
24
25
26
27
28
29
30
31
protected final void initServletBean() throws ServletException {
getServletContext().log("Initializing Spring " + getClass().getSimpleName() + " '" + getServletName() + "'");
if (logger.isInfoEnabled()) {
logger.info("Initializing Servlet '" + getServletName() + "'");
}
// 设置开始时间
long startTime = System.currentTimeMillis();

try {
// webApplicationContext是FrameworkServlet的上下文,后续的方法是进行上下万的初始化
this.webApplicationContext = initWebApplicationContext();
// 初始化FrameworkServlet,默认实现为null,由子类进行实现
initFrameworkServlet();
}
catch (ServletException | RuntimeException ex) {
logger.error("Context initialization failed", ex);
throw ex;
}

if (logger.isDebugEnabled()) {
String value = this.enableLoggingRequestDetails ?
"shown which may lead to unsafe logging of potentially sensitive data" :
"masked to prevent unsafe logging of potentially sensitive data";
logger.debug("enableLoggingRequestDetails='" + this.enableLoggingRequestDetails +
"': request parameters and headers will be " + value);
}

if (logger.isInfoEnabled()) {
logger.info("Completed initialization in " + (System.currentTimeMillis() - startTime) + " ms");
}
}

此后的流程会进入到Spring的onRefresh方法中,最终会调用DispatcherServlet中的onRefresh方法。

1
2
3
4
5
6
7
8
9
10
11
12
13
14
15
16
17
18
19
20
21
22
23
24
25
26
27
28
29
@Override
protected void onRefresh(ApplicationContext context) {
initStrategies(context);
}

/**
* Initialize the strategy objects that this servlet uses.
* <p>May be overridden in subclasses in order to initialize further strategy objects.进行springmvc组件的初始化,
*/
protected void initStrategies(ApplicationContext context) {
// 文件上传解析器
initMultipartResolver(context);
// 区域信息解析器,国际化相关
initLocaleResolver(context);
// 主题解析器
initThemeResolver(context);
// 处理映射器
initHandlerMappings(context);
// 处理适配器
initHandlerAdapters(context);
// 异常解析器
initHandlerExceptionResolvers(context);
// RequestToViewName解析器
initRequestToViewNameTranslator(context);
// 视图解析器
initViewResolvers(context);
// FlashMap解析器
initFlashMapManager(context);
}

​ 这几个组件的初始化过程都差不多,因此我们选择一个来重点描述,其他的需要大家下去之后自己来研究了。

1
2
3
4
5
6
7
8
9
10
11
12
13
14
15
16
17
18
19
20
21
22
23
24
25
26
27
28
29
30
31
32
33
34
35
36
private void initHandlerMappings(ApplicationContext context) {
this.handlerMappings = null;
// 是否查找所有HandlerMapping标识
if (this.detectAllHandlerMappings) {
// Find all HandlerMappings in the ApplicationContext, including ancestor contexts.
// 从上下文中查找HandlerMapping类型的Bean
Map<String, HandlerMapping> matchingBeans =
BeanFactoryUtils.beansOfTypeIncludingAncestors(context, HandlerMapping.class, true, false);
if (!matchingBeans.isEmpty()) {
this.handlerMappings = new ArrayList<>(matchingBeans.values());
// We keep HandlerMappings in sorted order.
AnnotationAwareOrderComparator.sort(this.handlerMappings);
}
}
else {
try {
// 根据指定名称获取HandlerMapping对象
HandlerMapping hm = context.getBean(HANDLER_MAPPING_BEAN_NAME, HandlerMapping.class);
this.handlerMappings = Collections.singletonList(hm);
}
catch (NoSuchBeanDefinitionException ex) {
// Ignore, we'll add a default HandlerMapping later.
}
}

// Ensure we have at least one HandlerMapping, by registering
// a default HandlerMapping if no other mappings are found.
// 确保至少有一个HandlerMapping,如果没有找到,使用默认策略,注册一个默认的
if (this.handlerMappings == null) {
this.handlerMappings = getDefaultStrategies(context, HandlerMapping.class);
if (logger.isTraceEnabled()) {
logger.trace("No HandlerMappings declared for servlet '" + getServletName() +
"': using default strategies from DispatcherServlet.properties");
}
}
}

通过默认策略来加载默认的配置项

1
2
3
4
5
6
7
8
9
10
11
12
13
14
15
16
17
18
19
20
21
22
23
24
25
26
27
28
29
protected <T> List<T> getDefaultStrategies(ApplicationContext context, Class<T> strategyInterface) {
String key = strategyInterface.getName();
String value = defaultStrategies.getProperty(key);
if (value != null) {
String[] classNames = StringUtils.commaDelimitedListToStringArray(value);
List<T> strategies = new ArrayList<>(classNames.length);
for (String className : classNames) {
try {
Class<?> clazz = ClassUtils.forName(className, DispatcherServlet.class.getClassLoader());
Object strategy = createDefaultStrategy(context, clazz);
strategies.add((T) strategy);
}
catch (ClassNotFoundException ex) {
throw new BeanInitializationException(
"Could not find DispatcherServlet's default strategy class [" + className +
"] for interface [" + key + "]", ex);
}
catch (LinkageError err) {
throw new BeanInitializationException(
"Unresolvable class definition for DispatcherServlet's default strategy class [" +
className + "] for interface [" + key + "]", err);
}
}
return strategies;
}
else {
return new LinkedList<>();
}
}

默认策略就完成了从DispatcherServlet.properties文件中加载的属性值

1
2
3
4
5
6
7
8
9
10
11
12
13
14
private static final Properties defaultStrategies;

static {
// Load default strategy implementations from properties file.
// This is currently strictly internal and not meant to be customized
// by application developers.
try {
ClassPathResource resource = new ClassPathResource(DEFAULT_STRATEGIES_PATH, DispatcherServlet.class);
defaultStrategies = PropertiesLoaderUtils.loadProperties(resource);
}
catch (IOException ex) {
throw new IllegalStateException("Could not load '" + DEFAULT_STRATEGIES_PATH + "': " + ex.getMessage());
}
}

​ 以上的操作就是DispatcherServlet的组件的初始化过程,下去之后一定要把每个过程详细看一下,如果能够结合spring进行查看就更好了。

2、DispatcherServlet的请求处理

​ 我们都知道当发送请求的时候每次都是找到Servlet的doget或者dopost方法中,但是你在DispatcherServlet中并没有看到这两个方法,还是按照老规矩,子类没有去父类找实现。

FrameworkServlet.java

1
2
3
4
5
6
7
8
9
10
11
12
@Override
protected final void doGet(HttpServletRequest request, HttpServletResponse response)
throws ServletException, IOException {

processRequest(request, response);
}
@Override
protected final void doPost(HttpServletRequest request, HttpServletResponse response)
throws ServletException, IOException {

processRequest(request, response);
}

​ 大家看到无论发送什么请求,最终都会进入到processRequest方法中,此方法用来处理我们从浏览器发送的请求,

1
2
3
4
5
6
7
8
9
10
11
12
13
14
15
16
17
18
19
20
21
22
23
24
25
26
27
28
29
30
31
32
33
34
35
36
37
38
39
40
41
42
43
44
protected final void processRequest(HttpServletRequest request, HttpServletResponse response)
throws ServletException, IOException {
// 记录启动时间
long startTime = System.currentTimeMillis();
Throwable failureCause = null;

// 获取之前设置的LocaleContext上下文
LocaleContext previousLocaleContext = LocaleContextHolder.getLocaleContext();
// 以当前的request作用域来创建一个上下文对象
LocaleContext localeContext = buildLocaleContext(request);

// 获取之前的request属性值
RequestAttributes previousAttributes = RequestContextHolder.getRequestAttributes();
// previousAttributes若为null,那么就new ServletRequestAttributes(request, response);如果不等于空,就直接返回
ServletRequestAttributes requestAttributes = buildRequestAttributes(request, response, previousAttributes);

// 获取异步管理器
WebAsyncManager asyncManager = WebAsyncUtils.getAsyncManager(request);
asyncManager.registerCallableInterceptor(FrameworkServlet.class.getName(), new RequestBindingInterceptor());
//将之前设置request和locale上下文绑定到requestContext中
initContextHolders(request, localeContext, requestAttributes);

try {
//在子类中进行逻辑实现
doService(request, response);
}
catch (ServletException | IOException ex) {
failureCause = ex;
throw ex;
}
catch (Throwable ex) {
failureCause = ex;
throw new NestedServletException("Request processing failed", ex);
}

finally {
resetContextHolders(request, previousLocaleContext, previousAttributes);
if (requestAttributes != null) {
requestAttributes.requestCompleted();
}
logResult(request, response, failureCause, asyncManager);
publishRequestHandledEvent(request, response, startTime, failureCause);
}
}

​ 大家看到了,在上述方法中,实际调用的是子类的doService方法,也就是DispatcherServlet中的方法实现,现在终于回归到我们要重点关注的类了,接着向下看;

DispatcherServlet doService

1
2
3
4
5
6
7
8
9
10
11
12
13
14
15
16
17
18
19
20
21
22
23
24
25
26
27
28
29
30
31
32
33
34
35
36
37
38
39
40
41
42
43
44
45
46
47
48
49
50
@Override
protected void doService(HttpServletRequest request, HttpServletResponse response) throws Exception {
logRequest(request);

// Keep a snapshot of the request attributes in case of an include,
// to be able to restore the original attributes after the include.
// 如果该请求是include的请求(请求包含) 那么就把request域中的数据保存一份快照版本
// 等doDispatch结束之后,会把这个快照版本的数据覆盖到新的request里面去
Map<String, Object> attributesSnapshot = null;
if (WebUtils.isIncludeRequest(request)) {
attributesSnapshot = new HashMap<>();
Enumeration<?> attrNames = request.getAttributeNames();
while (attrNames.hasMoreElements()) {
String attrName = (String) attrNames.nextElement();
if (this.cleanupAfterInclude || attrName.startsWith(DEFAULT_STRATEGIES_PREFIX)) {
attributesSnapshot.put(attrName, request.getAttribute(attrName));
}
}
}

// Make framework objects available to handlers and view objects.
// 把一些常用对象放进请求域 方便Handler里面可以随意获取
request.setAttribute(WEB_APPLICATION_CONTEXT_ATTRIBUTE, getWebApplicationContext());
request.setAttribute(LOCALE_RESOLVER_ATTRIBUTE, this.localeResolver);
request.setAttribute(THEME_RESOLVER_ATTRIBUTE, this.themeResolver);
request.setAttribute(THEME_SOURCE_ATTRIBUTE, getThemeSource());

// 从flashMapManager中获取重定向的相关参数
if (this.flashMapManager != null) {
FlashMap inputFlashMap = this.flashMapManager.retrieveAndUpdate(request, response);
if (inputFlashMap != null) {
request.setAttribute(INPUT_FLASH_MAP_ATTRIBUTE, Collections.unmodifiableMap(inputFlashMap));
}
request.setAttribute(OUTPUT_FLASH_MAP_ATTRIBUTE, new FlashMap());
request.setAttribute(FLASH_MAP_MANAGER_ATTRIBUTE, this.flashMapManager);
}

try {
//DispatcherServlet中最重要的方法,由此方法来分发请求,进行处理
doDispatch(request, response);
}
finally {
if (!WebAsyncUtils.getAsyncManager(request).isConcurrentHandlingStarted()) {
// Restore the original attribute snapshot, in case of an include.
if (attributesSnapshot != null) {
restoreAttributesAfterInclude(request, attributesSnapshot);
}
}
}
}

​ 到此为止,就该执行DispatcherServlet的核心方法doDispatcher,此方法完成了我们需要的全部功能,接着向下看。

3、DispatcherServlet的核心处理方法doDispatcher

1
2
3
4
5
6
7
8
9
10
11
12
13
14
15
16
17
18
19
20
21
22
23
24
25
26
27
28
29
30
31
32
33
34
35
36
37
38
39
40
41
42
43
44
45
46
47
48
49
50
51
52
53
54
55
56
57
58
59
60
61
62
63
64
65
66
67
68
69
70
71
72
73
74
75
76
77
78
79
80
81
82
83
84
85
86
87
88
89
90
91
92
93
94
95
96
97
98
99
100
101
102
103
104
105
protected void doDispatch(HttpServletRequest request, HttpServletResponse response) throws Exception {
// 定义一个已处理请求,指向参数的request
HttpServletRequest processedRequest = request;
// 定义处理器执行连,内部封装拦截器列表和处理器
HandlerExecutionChain mappedHandler = null;
// 是否有文件上传的请求标志
boolean multipartRequestParsed = false;

// 获取异步管理器,执行异步操作
WebAsyncManager asyncManager = WebAsyncUtils.getAsyncManager(request);

try {
// 保存处理器执行的返回结果
ModelAndView mv = null;
// 保存处理过程中的异常
Exception dispatchException = null;

try {
// 判断当前请求是否有上传需求,并返回保存到processedRequest中
processedRequest = checkMultipart(request);
// 判断当前请求是否是文件上传的请求,如果是则说明是上传请求已经处理
multipartRequestParsed = (processedRequest != request);

// Determine handler for the current request.
// 获取可处理当前请求的请求处理器,通过HandlerMapping进行查找
mappedHandler = getHandler(processedRequest);
// 如果没有,就执行没有处理器的逻辑
if (mappedHandler == null) {
// 在内部处理中抛出异常或者返回404
noHandlerFound(processedRequest, response);
return;
}

// Determine handler adapter for the current request.
// 根据当前请求的处理器获取支持该处理器的适配器
HandlerAdapter ha = getHandlerAdapter(mappedHandler.getHandler());

// Process last-modified header, if supported by the handler.
// 处理last-modified请求头,用于判断请求内容是否发生修改
String method = request.getMethod();
boolean isGet = "GET".equals(method);
// 只有get请求和head请求执行此判断
if (isGet || "HEAD".equals(method)) {
long lastModified = ha.getLastModified(request, mappedHandler.getHandler());
if (new ServletWebRequest(request, response).checkNotModified(lastModified) && isGet) {
return;
}
}

// 通过mappedHandler这个HandlerExecutionChain执行链的封装,链式执行所有连接器的前置拦截方法
if (!mappedHandler.applyPreHandle(processedRequest, response)) {
// 任意一个拦截器的前置拦截方法返回false,提前结束请求的处理
return;
}

// Actually invoke the handler.
// 执行处理适配器的处理方法,传入请求,对请求进行处理,此方法的返回值是ModelAndView对象,封装了模型和视图
mv = ha.handle(processedRequest, response, mappedHandler.getHandler());
// 如果是异步处理,则直接返回,后续处理通过异步执行
if (asyncManager.isConcurrentHandlingStarted()) {
return;
}
// 返回的mv对象中如果没有视图名称,则根据请求设置默认视图名
applyDefaultViewName(processedRequest, mv);
// 请求处理正常完成,链式执行所有拦截器的后置方法
mappedHandler.applyPostHandle(processedRequest, response, mv);
}
catch (Exception ex) {
// 保存异常信息
dispatchException = ex;
}
catch (Throwable err) {
// As of 4.3, we're processing Errors thrown from handler methods as well,
// making them available for @ExceptionHandler methods and other scenarios.
// 4.3版本之后提供了error类型异常的处理
dispatchException = new NestedServletException("Handler dispatch failed", err);
}
// 对下执行结果进行处理,包括视图的处理和异常的处理
processDispatchResult(processedRequest, response, mappedHandler, mv, dispatchException);
}
catch (Exception ex) {
// 链式执行拦截器链的afterCompletion方法
triggerAfterCompletion(processedRequest, response, mappedHandler, ex);
}
catch (Throwable err) {
// 拦截error类型异常,拦截后链式执行拦截器链的afterCompletion方法
triggerAfterCompletion(processedRequest, response, mappedHandler,
new NestedServletException("Handler processing failed", err));
}
// 做资源清理
finally {
if (asyncManager.isConcurrentHandlingStarted()) {
// Instead of postHandle and afterCompletion
if (mappedHandler != null) {
mappedHandler.applyAfterConcurrentHandlingStarted(processedRequest, response);
}
}
else {
// Clean up any resources used by a multipart request.
if (multipartRequestParsed) {
cleanupMultipart(processedRequest);
}
}
}
}

​ 如果把刚刚的大致流程都搞清楚的话,那么我们下面开始分析每一个环节的具体流程,下面的代码会比较多,大家尽力去理解。

3、上传组件的请求处理

processedRequest = checkMultipart(request);

1
2
3
4
5
6
7
8
9
10
11
12
13
14
15
16
17
18
19
20
21
22
23
24
25
26
27
28
29
30
31
32
33
protected HttpServletRequest checkMultipart(HttpServletRequest request) throws MultipartException {
// 判断当前请求是否包含文件上传的需求,如果是则执行后续逻辑
if (this.multipartResolver != null && this.multipartResolver.isMultipart(request)) {
// 判断当前请求是否是MultipartHttpServletRequest类型,如果是的话,就判断当前请求的类型是否是Request,如果是打印日志即可
if (WebUtils.getNativeRequest(request, MultipartHttpServletRequest.class) != null) {
if (request.getDispatcherType().equals(DispatcherType.REQUEST)) {
logger.trace("Request already resolved to MultipartHttpServletRequest, e.g. by MultipartFilter");
}
}
//判断是否有异常
else if (hasMultipartException(request)) {
logger.debug("Multipart resolution previously failed for current request - " +
"skipping re-resolution for undisturbed error rendering");
}
else {
try {
// 将当前请求包装返回一个新的包装对象StandardMultipartHttpServletRequest
return this.multipartResolver.resolveMultipart(request);
}
catch (MultipartException ex) {
if (request.getAttribute(WebUtils.ERROR_EXCEPTION_ATTRIBUTE) != null) {
logger.debug("Multipart resolution failed for error dispatch", ex);
// Keep processing error dispatch with regular request handle below
}
else {
throw ex;
}
}
}
}
// If not returned before: return original request.
return request;
}

4、获取请求处理器

mappedHandler = getHandler(processedRequest);

1
2
3
4
5
6
7
8
9
10
11
12
13
14
15
protected HandlerExecutionChain getHandler(HttpServletRequest request) throws Exception {
// 判断当前处理器映射列表不为空
if (this.handlerMappings != null) {
// 遍历全部处理器映射
for (HandlerMapping mapping : this.handlerMappings) {
// 执行当前处理器映射的获取处理器方法,获取与本次请求适配的处理器执行链
HandlerExecutionChain handler = mapping.getHandler(request);
// 不为空直接返回,即便有多个处理器执行链匹配,也只返回第一个,处理器映射排在前面的优先返回
if (handler != null) {
return handler;
}
}
}
return null;
}

在springmvc中默认会加载三个请求处理类:RequestMappingHandlerMapping、BeanNameUrlHandlerMapping、SimpleUrlHandlerMapping。这几个类都是在初始化的时候设置成功的,同样的,他们也具备相同的父类AbstractHandlerMapping,无论哪一个处理类最终都会嗲用getHandler方法,此方法在父类中,没有在子类中实现,下面来看这个方法的逻辑:

AbstractHandlerMapping getHandler()

1
2
3
4
5
6
7
8
9
10
11
12
13
14
15
16
17
18
19
20
21
22
23
24
25
26
27
28
29
30
31
32
33
34
35
36
37
public final HandlerExecutionChain getHandler(HttpServletRequest request) throws Exception {
//此方法留给子类实现,用于查找handler处理器,每个子类都有不同的实现,因此需要单独去查看
Object handler = getHandlerInternal(request);
// 如果handler为空,那么就使用默认的
if (handler == null) {
handler = getDefaultHandler();
}
// 如果还是为空的话,那么就直接返回
if (handler == null) {
return null;
}
// Bean name or resolved handler?
// 如果返回的handler为string,则使用Spring容器实例化
if (handler instanceof String) {
String handlerName = (String) handler;
handler = obtainApplicationContext().getBean(handlerName);
}
// 查询匹配的拦截器,组装handler生成HandlerExecutionChain
HandlerExecutionChain executionChain = getHandlerExecutionChain(handler, request);

if (logger.isTraceEnabled()) {
logger.trace("Mapped to " + handler);
}
else if (logger.isDebugEnabled() && !request.getDispatcherType().equals(DispatcherType.ASYNC)) {
logger.debug("Mapped to " + executionChain.getHandler());
}

// 判断是否是cors请求,cors是跨域请求
if (hasCorsConfigurationSource(handler) || CorsUtils.isPreFlightRequest(request)) {
CorsConfiguration config = (this.corsConfigurationSource != null ? this.corsConfigurationSource.getCorsConfiguration(request) : null);
CorsConfiguration handlerConfig = getCorsConfiguration(handler, request);
config = (config != null ? config.combine(handlerConfig) : handlerConfig);
executionChain = getCorsHandlerExecutionChain(request, executionChain, config);
}
// 返回处理器链
return executionChain;
}

5、获取请求处理类的适配器类

HandlerAdapter ha = getHandlerAdapter(mappedHandler.getHandler());

1
2
3
4
5
6
7
8
9
10
11
12
13
14
protected HandlerAdapter getHandlerAdapter(Object handler) throws ServletException {
if (this.handlerAdapters != null) {
// 遍历处理适配器列表,根据support方法来进行判断
for (HandlerAdapter adapter : this.handlerAdapters) {
// 当找到支持的适配器则返回
if (adapter.supports(handler)) {
return adapter;
}
}
}
// 未找到适配器则直接抛出异常
throw new ServletException("No adapter for handler [" + handler +
"]: The DispatcherServlet configuration needs to include a HandlerAdapter that supports this handler");
}

此适配器集合共有三个具体实现子类,分别是:HttpRequestHandlerAdapter、SimpleControllerHandlerAdapter、RequestMappingHandlerAdapter,然后根据support方法来判断使用哪种适配器,并将对应的适配器对象返回。

6、执行前置拦截器链

if (!mappedHandler.applyPreHandle(processedRequest, response))

1
2
3
4
5
6
7
8
9
10
11
12
13
14
15
16
17
18
19
boolean applyPreHandle(HttpServletRequest request, HttpServletResponse response) throws Exception {
// 获取当前处理器执行链中的所有拦截器
HandlerInterceptor[] interceptors = getInterceptors();
if (!ObjectUtils.isEmpty(interceptors)) {
// 正序遍历全部拦截器
for (int i = 0; i < interceptors.length; i++) {
HandlerInterceptor interceptor = interceptors[i];
// 执行拦截器的prehandle方法,如果返回false则直接停止执行视为处理完成,触发拦截器的完成后方法
if (!interceptor.preHandle(request, response, this.handler)) {
triggerAfterCompletion(request, response, null);
return false;
}
// 如果为true,拦截器索引设置为当前遍历索引
this.interceptorIndex = i;
}
}
// 全部执行完成,返回true,表示继续执行下一步
return true;
}

7、根据适配器类去处理对应的请求,并返回ModelAndView对象

mv = ha.handle(processedRequest, response, mappedHandler.getHandler());

1
2
3
4
5
6
public ModelAndView handle(HttpServletRequest request, HttpServletResponse response, Object handler)
throws Exception {
// 调用具体的适配器子类去处理请求
((HttpRequestHandler) handler).handleRequest(request, response);
return null;
}

7、设置默认的视图名称

applyDefaultViewName(processedRequest, mv);

1
2
3
4
5
6
7
8
9
10
11
12
13
14
/**
* Do we need view name translation?
*/
private void applyDefaultViewName(HttpServletRequest request, @Nullable ModelAndView mv) throws Exception {
// 如果返回值不为空,且不包含视图
if (mv != null && !mv.hasView()) {
// 根据逻辑获取默认视图名
String defaultViewName = getDefaultViewName(request);
// 如果获取的默认视图名不为空,则将其设置为modelAndView的视图名
if (defaultViewName != null) {
mv.setViewName(defaultViewName);
}
}
}

8、执行后置拦截器链

mappedHandler.applyPostHandle(processedRequest, response, mv);

1
2
3
4
5
6
7
8
9
10
11
12
13
void applyPostHandle(HttpServletRequest request, HttpServletResponse response, @Nullable ModelAndView mv)
throws Exception {
// 获取全部拦截器
HandlerInterceptor[] interceptors = getInterceptors();
if (!ObjectUtils.isEmpty(interceptors)) {
// 倒序遍历全部拦截器
for (int i = interceptors.length - 1; i >= 0; i--) {
HandlerInterceptor interceptor = interceptors[i];
// 直接执行,无返回值
interceptor.postHandle(request, response, this.handler, mv);
}
}
}

9、处理Controller返回的结果

processDispatchResult(processedRequest, response, mappedHandler, mv, dispatchException);

1
2
3
4
5
6
7
8
9
10
11
12
13
14
15
16
17
18
19
20
21
22
23
24
25
26
27
28
29
30
31
32
33
34
35
36
37
38
39
40
41
42
43
44
45
46
47
48
49
50
private void processDispatchResult(HttpServletRequest request, HttpServletResponse response,
@Nullable HandlerExecutionChain mappedHandler, @Nullable ModelAndView mv,
@Nullable Exception exception) throws Exception {
// 判断是否是error视图
boolean errorView = false;
// 如果有异常,就 进入异常处理逻辑,返回到异常页面
if (exception != null) {
// 如果异常类型为ModelAndViewDefiningException
if (exception instanceof ModelAndViewDefiningException) {
logger.debug("ModelAndViewDefiningException encountered", exception);
// 直接使用异常中封装的ModelAndView作为最终的mv结果
mv = ((ModelAndViewDefiningException) exception).getModelAndView();
}
else {
// 其他异常类型,先获取处理器
Object handler = (mappedHandler != null ? mappedHandler.getHandler() : null);
// 执行process处理其异常方法,获取处理了异常结果后得到的mv结果
mv = processHandlerException(request, response, handler, exception);
// 如果mv不为空,则说明返回了包含异常的视图,
errorView = (mv != null);
}
}

// Did the handler return a view to render?
// 如果mv不为空且mv没有标记为被清理,
if (mv != null && !mv.wasCleared()) {
// 执行视图渲染的操作
render(mv, request, response);
// 如果是异常视图,渲染后需要清空请求属性中的异常信息
if (errorView) {
WebUtils.clearErrorRequestAttributes(request);
}
}
else {
// 如果视图为空,则打印一个日志
if (logger.isTraceEnabled()) {
logger.trace("No view rendering, null ModelAndView returned.");
}
}
// 如果异步处理已经开始,则直接返回结束执行
if (WebAsyncUtils.getAsyncManager(request).isConcurrentHandlingStarted()) {
// Concurrent handling started during a forward
return;
}
// 执行拦截器的AfterCompletion方法
if (mappedHandler != null) {
// Exception (if any) is already handled..
mappedHandler.triggerAfterCompletion(request, response, null);
}
}

​ 在上述的处理过程中,有两个比较重要的方法,第一个是发生异常时,把异常处理为mv返回值的逻辑processHandlerException,第二个是对返回的mv结果进行渲染的逻辑render。

10、处理器异常处理方法

mv = processHandlerException(request, response, handler, exception);

1
2
3
4
5
6
7
8
9
10
11
12
13
14
15
16
17
18
19
20
21
22
23
24
25
26
27
28
29
30
31
32
33
34
35
36
37
38
39
40
41
42
43
44
45
46
47
48
49
50
51
52
@Nullable
protected ModelAndView processHandlerException(HttpServletRequest request, HttpServletResponse response,
@Nullable Object handler, Exception ex) throws Exception {

// Success and error responses may use different content types
request.removeAttribute(HandlerMapping.PRODUCIBLE_MEDIA_TYPES_ATTRIBUTE);

// Check registered HandlerExceptionResolvers...
ModelAndView exMv = null;
// 如果处理器异常解析器列表不为空
if (this.handlerExceptionResolvers != null) {
// 遍历该列表
for (HandlerExceptionResolver resolver : this.handlerExceptionResolvers) {
// 执行处理器异常解析器的解析异常方法,拿到解析的ModelAndView的结果
exMv = resolver.resolveException(request, response, handler, ex);
// 如果不为空,则将此结果作为对异常处理后的mv结果使用,中断后续的遍历动作
if (exMv != null) {
break;
}
}
}
// 如果返回的异常mv不为null
if (exMv != null) {
// 如果mv内部为空
if (exMv.isEmpty()) {
// 设置异常属性到请求属性中
request.setAttribute(EXCEPTION_ATTRIBUTE, ex);
return null;
}
// We might still need view name translation for a plain error model...
// 如果异常mv不包含视图
if (!exMv.hasView()) {
// 采用与doDispatch方法中相同的处理逻辑来给很具请求获取默认视图名
String defaultViewName = getDefaultViewName(request);
if (defaultViewName != null) {
exMv.setViewName(defaultViewName);
}
}
if (logger.isTraceEnabled()) {
logger.trace("Using resolved error view: " + exMv, ex);
}
else if (logger.isDebugEnabled()) {
logger.debug("Using resolved error view: " + exMv);
}
// 暴露溢写异常信息到请求属性中
WebUtils.exposeErrorRequestAttributes(request, ex, getServletName());
// 返回新的mv异常视图模型
return exMv;
}
// 如果没有处理器异常解析器,则原封不动抛出原始异常,交给web框架处理
throw ex;
}

11、视图渲染方法:

render(mv, request, response);

1
2
3
4
5
6
7
8
9
10
11
12
13
14
15
16
17
18
19
20
21
22
23
24
25
26
27
28
29
30
31
32
33
34
35
36
37
38
39
40
41
42
43
44
45
46
47
48
49
50
51
protected void render(ModelAndView mv, HttpServletRequest request, HttpServletResponse response) throws Exception {
// Determine locale for request and apply it to the response.
// 先通过Locale解析器获取请求对应的Locale
Locale locale =
(this.localeResolver != null ? this.localeResolver.resolveLocale(request) : request.getLocale());
// 设置获取的Locale为响应的Locale
response.setLocale(locale);
// 最终获取的视图
View view;
// 如果mv中的视图为视图名,则获取这个视图名
String viewName = mv.getViewName();
if (viewName != null) {
// We need to resolve the view name.
// 把视图名解析为视图
view = resolveViewName(viewName, mv.getModelInternal(), locale, request);
// 无法根绝视图名解析视图时抛出异常
if (view == null) {
throw new ServletException("Could not resolve view with name '" + mv.getViewName() +
"' in servlet with name '" + getServletName() + "'");
}
}
else {
// No need to lookup: the ModelAndView object contains the actual View object.
// 如果不是视图名,而直接是一个视图类型,则获取视图
view = mv.getView();
// 视图为空时同样抛出异常
if (view == null) {
throw new ServletException("ModelAndView [" + mv + "] neither contains a view name nor a " +
"View object in servlet with name '" + getServletName() + "'");
}
}

// Delegate to the View object for rendering.
if (logger.isTraceEnabled()) {
logger.trace("Rendering view [" + view + "] ");
}
try {
// 如果mv中的status为空,则把其设置为响应的状态码,
if (mv.getStatus() != null) {
response.setStatus(mv.getStatus().value());
}
// 执行视图的渲染方法,每种模板引擎都有其对应的视图实现,视图渲染对应于模板引擎的渲染模板
view.render(mv.getModelInternal(), request, response);
}
catch (Exception ex) {
if (logger.isDebugEnabled()) {
logger.debug("Error rendering view [" + view + "]", ex);
}
throw ex;
}
}

view = resolveViewName(viewName, mv.getModelInternal(), locale, request);

1
2
3
4
5
6
7
8
9
10
11
12
13
14
15
16
17
@Nullable
protected View resolveViewName(String viewName, @Nullable Map<String, Object> model,
Locale locale, HttpServletRequest request) throws Exception {
// 如果视图解析器列表不为空
if (this.viewResolvers != null) {
// 遍历视图解析器列表
for (ViewResolver viewResolver : this.viewResolvers) {
// 调用视图解析器的resolveViewName方法,把视图名解析为视图
View view = viewResolver.resolveViewName(viewName, locale);
// 第一个不为空的视图返回
if (view != null) {
return view;
}
}
}
return null;
}